NixOS Planet

November 10, 2020

Cachix

Write access control for binary caches

As Cachix is growing, I have noticed a few things along the way by observing the issues that came up: Signing keys are still the best way to upload content and not delegate the trust to Cachix, but users also found out that they can be difficult to manage. In particular if the secret key need to be rotated, be it because it was leaked by mistake, or when a colleague is leaving.

by Domen Kožar (support@cachix.org) at November 10, 2020 11:00 AM

October 31, 2020

Sander van der Burg

Building multi-process Docker images with the Nix process management framework

Some time ago, I have described my experimental Nix-based process management framework that makes it possible to automatically deploy running processes (sometimes also ambiguously called services) from declarative specifications written in the Nix expression language.

The framework is built around two concepts. As its name implies, the Nix package manager is used to deploy all required packages and static artifacts, and a process manager of choice (e.g. sysvinit, systemd, supervisord and others) is used to manage the life-cycles of the processes.

Moreover, it is built around flexible concepts allowing integration with solutions that are not qualified as process managers (but can still be used as such), such as Docker -- each process instance can be deployed as a Docker container with a shared Nix store using the host system's network.

As explained in an earlier blog post, Docker has become such a popular solution that it has become a standard for deploying (micro)services (often as a utility in the Kubernetes solution stack).

When deploying a system that consists of multiple services with Docker, a typical strategy (and recommended practice) is to use multiple containers that have only one root application process. Advantages of this approach is that Docker can control the life-cycles of the applications, and that each process is (somewhat) isolated/protected from other processes and the host system.

By default, containers are isolated, but if they need to interact with other processes, then they can use all kinds of integration facilities -- for example, they can share namespaces, or use shared volumes.

In some situations, it may also be desirable to deviate from the one root process per container practice -- for some systems, processes may need to interact quite intensively (e.g. with IPC mechanisms, shared files or shared memory, or a combination these) in which the cointainer boundaries introduce more inconveniences than benefits.

Moreover, when running multiple processes in a single container, common dependencies can also typically be more efficiently shared leading to lower disk and RAM consumption.

As explained in my previous blog post (that explores various Docker concepts), sharing dependencies between containers only works if containers are constructed from images that share the same layers with the same shared libraries. In practice, this form of sharing is not always as efficient as we want it to be.

Configuring a Docker image to run multiple application processes is somewhat cumbersome -- the official Docker documentation describes two solutions: one that relies on a wrapper script that starts multiple processes in the background and a loop that waits for the "main process" to terminate, and the other is to use a process manager, such as supervisord.

I realised that I could solve this problem much more conveniently by combining the dockerTools.buildImage {} function in Nixpkgs (that builds Docker images with the Nix package manager) with the Nix process management abstractions.

I have created my own abstraction function: createMultiProcessImage that builds multi-process Docker images, managed by any supported process manager that works in a Docker container.

In this blog post, I will describe how this function is implemented and how it can be used.

Creating images for single root process containers


As shown in earlier blog posts, creating a Docker image with Nix for a single root application process is very straight forward.

For example, we can build an image that launches a trivial web application service with an embedded HTTP server (as shown in many of my previous blog posts), as follows:


{dockerTools, webapp}:

dockerTools.buildImage {
name = "webapp";
tag = "test";

runAsRoot = ''
${dockerTools.shadowSetup}
groupadd webapp
useradd webapp -g webapp -d /dev/null
'';

config = {
Env = [ "PORT=5000" ];
Cmd = [ "${webapp}/bin/webapp" ];
Expose = {
"5000/tcp" = {};
};
};
}

The above Nix expression (default.nix) invokes the dockerTools.buildImage function to automatically construct an image with the following properties:

  • The image has the following name: webapp and the following version tag: test.
  • The web application service requires some state to be initialized before it can be used. To configure state, we can run instructions in a QEMU virual machine with root privileges (runAsRoot).

    In the above deployment Nix expression, we create an unprivileged user and group named: webapp. For production deployments, it is typically recommended to drop root privileges, for security reasons.
  • The Env directive is used to configure environment variables. The PORT environment variable is used to configure the TCP port where the service should bind to.
  • The Cmd directive starts the webapp process in foreground mode. The life-cycle of the container is bound to this application process.
  • Expose exposes TCP port 5000 to the public so that the service can respond to requests made by clients.

We can build the Docker image as follows:


$ nix-build

load it into Docker with the following command:


$ docker load -i result

and launch a container instance using the image as a template:


$ docker run -it -p 5000:5000 webapp:test

If the deployment of the container succeeded, we should get a response from the webapp process, by running:


$ curl http://localhost:5000
<!DOCTYPE html>
<html>
<head>
<title>Simple test webapp</title>
</head>
<body>
Simple test webapp listening on port: 5000
</body>
</html>

Creating multi-process images


As shown in previous blog posts, the webapp process is part of a bigger system, namely: a web application system with an Nginx reverse proxy forwaring requests to multiple webapp instances:


{ pkgs ? import <nixpkgs> { inherit system; }
, system ? builtins.currentSystem
, stateDir ? "/var"
, runtimeDir ? "${stateDir}/run"
, logDir ? "${stateDir}/log"
, cacheDir ? "${stateDir}/cache"
, tmpDir ? (if stateDir == "/var" then "/tmp" else "${stateDir}/tmp")
, forceDisableUserChange ? false
, processManager
}:

let
sharedConstructors = import ../services-agnostic/constructors.nix {
inherit pkgs stateDir runtimeDir logDir cacheDir tmpDir forceDisableUserChange processManager;
};

constructors = import ./constructors.nix {
inherit pkgs stateDir runtimeDir logDir tmpDir forceDisableUserChange processManager;
};
in
rec {
webapp = rec {
port = 5000;
dnsName = "webapp.local";

pkg = constructors.webapp {
inherit port;
};
};

nginx = rec {
port = 8080;

pkg = sharedConstructors.nginxReverseProxyHostBased {
webapps = [ webapp ];
inherit port;
} {};
};
}

The Nix expression above shows a simple processes model variant of that system, that consists of only two process instances:

  • The webapp process is (as shown earlier) an application that returns a static HTML page.
  • nginx is configured as a reverse proxy to forward incoming connections to multiple webapp instances using the virtual host header property (dnsName).

    If somebody connects to the nginx server with the following host name: webapp.local then the request is forwarded to the webapp service.

Configuration steps


To allow all processes in the process model shown to be deployed to a single container, we need to execute the following steps in the construction of an image:

  • Instead of deploying a single package, such as webapp, we need to refer to a collection of packages and/or configuration files that can be managed with a process manager, such as sysvinit, systemd or supervisord.

    The Nix process management framework provides all kinds of Nix function abstractions to accomplish this.

    For example, the following function invocation builds a configuration profile for the sysvinit process manager, containing a collection of sysvinit scripts (also known as LSB Init compliant scripts):


    profile = import ../create-managed-process/sysvinit/build-sysvinit-env.nix {
    exprFile = ./processes.nix;
    stateDir = "/var";
    };

  • Similar to single root process containers, we may also need to initialize state. For example, we need to create common FHS state directories (e.g. /tmp, /var etc.) in which services can store their relevant state files (e.g. log files, temp files).

    This can be done by running the following command:


    nixproc-init-state --state-dir /var
  • Another property that multiple process containers have in common is that they may also require the presence of unprivileged users and groups, for security reasons.

    With the following commands, we can automatically generate all required users and groups specified in a deployment profile:


    ${dysnomia}/bin/dysnomia-addgroups ${profile}
    ${dysnomia}/bin/dysnomia-addusers ${profile}
  • Instead of starting a (single root) application process, we need to start a process manager that manages the processes that we want to deploy. As already explained, the framework allows you to pick multiple options.

Starting a process manager as a root process


From all process managers that the framework currently supports, the most straight forward option to use in a Docker container is: supervisord.

To use it, we can create a symlink to the supervisord configuration in the deployment profile:


ln -s ${profile} /etc/supervisor

and then start supervisord as a root process with the following command directive:


Cmd = [
"${pkgs.pythonPackages.supervisor}/bin/supervisord"
"--nodaemon"
"--configuration" "/etc/supervisor/supervisord.conf"
"--logfile" "/var/log/supervisord.log"
"--pidfile" "/var/run/supervisord.pid"
];

(As a sidenote: creating a symlink is not strictly required, but makes it possible to control running services with the supervisorctl command-line tool).

Supervisord is not the only option. We can also use sysvinit scripts, but doing so is a bit tricky. As explained earlier, the life-cycle of container is bound to a running root process (in foreground mode).

sysvinit scripts do not run in the foreground, but start processes that daemonize and terminate immediately, leaving daemon processes behind that remain running in the background.

As described in an earlier blog post about translating high-level process management concepts, it is also possible to run "daemons in the foreground" by creating a proxy script. We can also make a similar foreground proxy for a collection of daemons:


#!/bin/bash -e

_term()
{
nixproc-sysvinit-runactivity -r stop ${profile}
kill "$pid"
exit 0
}

nixproc-sysvinit-runactivity start ${profile}

# Keep process running, but allow it to respond to the TERM and INT
# signals so that all scripts are stopped properly

trap _term TERM
trap _term INT

tail -f /dev/null & pid=$!
wait "$pid"

The above proxy script does the following:

  • It first starts all sysvinit scripts by invoking the nixproc-sysvinit-runactivity start command.
  • Then it registers a signal handler for the TERM and INT signals. The corresponding callback triggers a shutdown procedure.
  • We invoke a dummy command that keeps running in the foreground without consuming too many system resources (tail -f /dev/null) and we wait for it to terminate.
  • The signal handler properly deactivates all processes in reverse order (with the nixproc-sysvinit-runactivity -r stop command), and finally terminates the dummy command causing the script (and the container) to stop.

In addition supervisord and sysvinit, we can also use Disnix as a process manager by using a similar strategy with a foreground proxy.

Other configuration properties


The above configuration properties suffice to get a multi-process container running. However, to make working with such containers more practical from a user perspective, we may also want to:

  • Add basic shell utilities to the image, so that you can control the processes, investigate log files (in case of errors), and do other maintenance tasks.
  • Add a .bashrc configuration file to make file coloring working for the ls command, and to provide a decent prompt in a shell session.

Usage


The configuration steps described in the previous section are wrapped into a function named: createMultiProcessImage, which itself is a thin wrapper around the dockerTools.buildImage function in Nixpkgs -- it accepts the same parameters with a number of additional parameters that are specific to multi-process configurations.

The following function invocation builds a multi-process container deploying our example system, using supervisord as a process manager:


let
pkgs = import <nixpkgs> {};

createMultiProcessImage = import ../../nixproc/create-multi-process-image/create-multi-process-image.nix {
inherit pkgs system;
inherit (pkgs) dockerTools stdenv;
};
in
createMultiProcessImage {
name = "multiprocess";
tag = "test";
exprFile = ./processes.nix;
stateDir = "/var";
processManager = "supervisord";
}

After building the image, and deploying a container, with the following commands:


$ nix-build
$ docker load -i result
$ docker run -it --network host multiprocessimage:test

we should be able to connect to the webapp instance via the nginx reverse proxy:


$ curl -H 'Host: webapp.local' http://localhost:8080
<!DOCTYPE html>
<html>
<head>
<title>Simple test webapp</title>
</head>
<body>
Simple test webapp listening on port: 5000
</body>
</html>

As explained earlier, the constructed image also provides extra command-line utilities to do maintenance tasks, and control the lifecycle of the individual processes.

For example, we can "connect" to the running container, and check which processes are running:


$ docker exec -it mycontainer /bin/bash
# supervisorctl
nginx RUNNING pid 11, uptime 0:00:38
webapp RUNNING pid 10, uptime 0:00:38
supervisor>

If we change the processManager parameter to sysvinit, we can deploy a multi-process image in which the foreground proxy script is used as a root process (that starts and stops sysvinit scripts).

We can control the life-cycle of each individual process by directly invoking the sysvinit scripts in the container:


$ docker exec -it mycontainer /bin/bash
$ /etc/rc.d/init.d/webapp status
webapp is running with Process ID(s) 33.

$ /etc/rc.d/init.d/nginx status
nginx is running with Process ID(s) 51.

Although having extra command-line utilities to do administration tasks is useful, a disadvantage is that they considerably increase the size of the image.

To save storage costs, it is also possible to disable interactive mode to exclude these packages:


let
pkgs = import <nixpkgs> {};

createMultiProcessImage = import ../../nixproc/create-multi-process-image/create-multi-process-image.nix {
inherit pkgs system;
inherit (pkgs) dockerTools stdenv;
};
in
createMultiProcessImage {
name = "multiprocess";
tag = "test";
exprFile = ./processes.nix;
stateDir = "/var";
processManager = "supervisord";
interactive = false; # Do not install any additional shell utilities
}

Discussion


In this blog post, I have described a new utility function in the Nix process management framework: createMultiProcessImage -- a thin wrapper around the dockerTools.buildImage function that can be used to convienently build multi-process Docker images, using any Docker-capable process manager that the Nix process management framework supports.

Besides the fact that we can convienently construct multi-process images, this function also has the advantage (similar to the dockerTools.buildImage function) that Nix is only required for the construction of the image. To deploy containers from a multi-process image, Nix is not a requirement.

There is also a drawback: similar to "ordinary" multi-process container deployments, when it is desired to upgrade a process, the entire container needs to be redeployed, also requiring a user to terminate all other running processes.

Availability


The createMultiProcessImage function is part of the current development version of the Nix process management framework that can be obtained from my GitHub page.

by Sander van der Burg (noreply@blogger.com) at October 31, 2020 03:05 PM

October 22, 2020

Tweag I/O

Nickel: better configuration for less

We are making the Nickel repository public. Nickel is an experimental configuration language developed at Tweag. While this is not the time for the first release yet, it is an occasion to talk about this project. The goal of this post is to give a high-level overview of the project. If your curiosity is tickled but you are left wanting to learn more, fear not, as we will publish more blog posts on specific aspects of the language in the future. But for now, let’s have a tour!

[Disclaimer: the actual syntax of Nickel being still worked on, I’m freely using as-of-yet non-existing syntax for illustrative purposes. The underlying features are however already supported.]

The inception

We, at Tweag, are avid users of the Nix package manager. As it happens, the configuration language for Nix (also called Nix) is a pretty good configuration language, and would be applicable to many more things than just package management.

All in all, the Nix language is a lazy JSON with functions. It is simple yet powerful. It is used to generate Nix’s package descriptions but would be well suited to write any kind of configuration (Terraform, Kubernetes, etc…).

The rub is that the interpreter for Nix-the-language is tightly coupled with Nix-the-package manager. So, as it stands, using the Nix language for anything else than package management is a rather painful exercise.

Nickel is our attempt at answering the question: what would Nix-the-language look like if it was split from the package manager? While taking the opportunity to improve the language a little, building on the experience of the Nix community over the years.

What’s Nickel, exactly ?

Nickel is a lightweight generic configuration language. In that it can replace YAML as your application’s configuration language. Unlike YAML, though, it anticipates large configurations by being programmable. Another way to use Nickel is to generate static configuration files — e.g. in JSON, YAML — that are then fed to another system. Like Nix, it is designed to have a simple, well-understood core: at its heart, it is JSON with functions.

But past experience with Nix also brings some insights on which aspects of the language could be improved. Whatever the initial scope of a language is, it will almost surely be used in a way that deviates from the original plan: you create a configuration language to describe software packages, and next thing you know, somebody needs to implement a topological sort.

Nickel strives to retain the simplicity of Nix, while extending it according to this feedback. Though, you can do perfectly fine without the new features and just write Nix-like code.

Yet another configuration language

At this point you’re probably wondering if this hasn’t already been done elsewhere. It seems that more and more languages are born every day, and surely there already exist configuration languages with a similar purpose to Nickel: Starlark, Jsonnet, Dhall or CUE, to name a few. So why Nickel?

Typing

Perhaps the most important difference with other configuration languages is Nickel’s approach to typing.

Some languages, such as Jsonnet or Starlark, are not statically typed. Indeed, static types can be seen as superflous in a configuration language: if your program is only run once on fixed inputs, any type error will be reported at run-time anyway. Why bother with a static type system?

On the other hand, more and more systems rely on complex configurations, such as cloud infrastructure (Terraform, Kubernetes or NixOps), leading the corresponding programs to become increasingly complex, to the point where static types are beneficial. For reusable code — that is, library functions — static types add structure, serve as documentation, and eliminate bugs early.

Although less common, some configuration languages are statically typed, including Dhall and CUE.

Dhall features a powerful type system that is able to type a wide range of idioms. But it is complex, requiring some experience to become fluent in.

CUE is closer to what we are striving for. It has an optional and well-behaved type system with strong guarantees. In exchange for which, one can’t write nor type higher-order functions in general, even if some simple functions are possible to encode.

Gradual typing

Nickel, features a gradual type system. Gradual types are unobtrusive: they make it possible to statically type reusable parts of your programs, but you are still free to write configurations without any types. The interpreter safely handles the interaction between the typed and untyped worlds.

Concretely, typed library code like this:

// file: mylib.ncl
{
  numToStr : Num -> Str = fun n => ...;
  makeURL : Str -> Str -> Num -> Str = fun proto host port =>
    "${proto}://${host}:${numToStr port}/";
}

can coexist with untyped configuration code like this:

// file: server.ncl
let mylib = import "mylib.ncl" in
let host = "myproject.com" in
{
  host = host;
  port = 1;
  urls = [
    mylib.makeURL "myproto" host port,
    {protocol = "proto2"; server = "sndserver.net"; port = 4242}
  ];
}

In the first snippet, the body of numToStr and makeURL are statically checked: wrongfully calling numToStr proto inside makeURL would raise an error even if makeURL is never used. On the other hand, the second snippet is not annotated, and thus not statically checked. In particular, we mix an URL represented as a string together with one represented as a record in the same list. The interpreter rather inserts run-time checks, or contracts, such that if makeURL is misused then the program fails with an appropriate error.

Gradual types also lets us keep the type system simple: even in statically typed code if you want to write a component that the type checker doesn’t know how to verify, you don’t have to type-check that part.

Contracts

Complementary to the static type system, Nickel offers contracts. Contracts offer precise and accurate dynamic type error reporting, even in the presence of function types. Contracts are used internally by Nickel’s interpreter to insert guards at the boundary between typed and untyped chunks. Contracts are available to the programmer as well, to give them the ability to enforce type assertions at run-time in a simple way.

One pleasant consequence of this design is that the exposure of the user to the type system can be progressive:

  • Users writing configurations can just write Nix-like code while ignoring (almost) everything about typing, since you can seamlessly call a typed function from untyped code.
  • Users writing consumers or verifiers of these configurations would use contracts to model data schemas.
  • Users writing libraries would instead use the static type system.

An example of contract is given in the next section.

Schemas

While the basic computational blocks are functions, the basic data blocks in Nickel are records (or objects in JSON). Nickel supports writing self-documenting record schemas, such as:

{
  host | type: Str
       | description: "The host name of the server."
       | default: "fallback.myserver.net"
  ;

  port | type: Num
       | description: "The port of the connection."
       | default: 4242
  ;

  url | type: Url
      | description: "The host name of the server."
  ;
}

Each field can contain metadata, such as a description or default value. These aim at being displayed in documentation, or queried by tools.

The schema can then be used as a contract. Imagine that a function has swapped two values in its output and returns:

{
  host = "myproject.com",
  port = "myproto://myproject.com:1/",
  url = 1
}

Without types, this is hard to catch. Surely, an error will eventually pop up downstream in the pipeline, but how and when? Using the schema above will make sure that, whenever the fields are actually evaluated, the function will be blamed in the type error.

Schemas are actually part of a bigger story involving merging records together, which, in particular, lets the schema instantiate missing fields with their default values. It is very much inspired by the NixOs module system and the CUE language, but it is a story for another time.

Conclusion

I hope that I gave you a sense of what Nickel is trying to achieve. I only presented its most salient aspects: its gradual type system with contracts, and built-in record schemas. But there is more to explore! The language is not ready to be used in real world applications yet, but a good share of the design presented here is implemented. If you are curious about it, check it out!

October 22, 2020 12:00 AM

October 08, 2020

Sander van der Burg

Transforming Disnix models to graphs and visualizing them

In my previous blog post, I have described a new tool in the Dynamic Disnix toolset that can be used to automatically assign unique numeric IDs to services in a Disnix service model. Unique numeric IDs can represent all kinds of useful resources, such as TCP/UDP port numbers, user IDs (UIDs), and group IDs (GIDs).

Although I am quite happy to have this tool at my disposal, implementing it was much more difficult and time consuming than I expected. Aside from the fact that the problem is not as obvious as it may sound, the main reason is that the Dynamic Disnix toolset was originally developed as a proof of concept implementation for a research paper under very high time pressure. As a result, it has accumulated quite a bit of technical debt, that as of today, is still at a fairly high level (but much better than it was when I completed the PoC).

For the ID assigner tool, I needed to make changes to the foundations of the tools, such as the model parsing libraries. As a consequence, all kinds of related aspects in the toolset started to break, such as the deployment planning algorithm implementations.

Fixing some of these algorithm implementations was much more difficult than I expected -- they were not properly documented, not decomposed into functions, had little to no reuse of common concepts and as a result, were difficult to understand and change. I was forced to re-read the papers that I used as a basis for these algorithms.

To prevent myself from having to go through such a painful process again, I have decided to revise them in such a way that they are better understandable and maintainable.

Dynamically distributing services


The deployment models in the core Disnix toolset are static. For example, the distribution of services to machines in the network is done in a distribution model in which the user has to manually map services in the services model to target machines in the infrastructure model (and optionally to container services hosted on the target machines).

Each time a condition changes, e.g. the system needs to scale up or a machine crashes and the system needs to recover, a new distribution model must be configured and the system must be redeployed. For big complex systems that need to be reconfigured frequently, manually specifying new distribution models becomes very impractical.

As I have already explained in older blog posts, to cope with the limitations of static deployment models (and other static configuration aspects), I have developed Dynamic Disnix, in which various configuration aspects can be automated, including the distribution of services to machines.

A strategy for dynamically distributing services to machines can be specified in a QoS model, that typically consists of two phases:

  • First, a candidate target selection must be made, in which for each service the arppropriate candidate target machines are selected.

    Not all machines are capable of hosting a certain service for functional and non-functional reasons -- for example, a i686-linux machine is not capable of running a binary compiled for a x86_64-linux machine.

    A machine can also be exposed to the public internet, and as a result, may not be suitable to host a service that exposes privacy-sensitive information.
  • After the suitable candidate target machines are known for each service, we must decide to which candidate machine each service gets distributed.

    This can be done in many ways. The strategy that we want to use is typically based on all kinds of non-functional requirements.

    For example, we can optimize a system's reliability by minimizing the amount of network links between services, requiring a strategy in which services that depend on each other are mapped to the same machine, as much as possible.

Graph-based optimization problems


In the Dynamic Disnix toolset, I have implemented various kinds of distribution algorithms/strategies for all kinds of purposes.

I did not "invent" most of them -- for some, I got inspiration from papers in the academic literature.

Two of the more advanced deployment planning algorithms are graph-based, to accomplish the following goals:

  • Reliable deployment. Network links are a potential source making a distributed system unreliable -- connections may fail, become slow, or could be interrupted frequently. By minimizing the amount of network links between services (by co-locating them on the same machine), their impact can be reduced. To not make deployments not too expensive, it should be done with a minimal amount of machines.

    As described in the paper: "Reliable Deployment of Component-based Applications into Distributed Environments" by A. Heydarnoori and F. Mavaddat, this problem can be transformed into a graph problem: the multiway cut problem (which is NP-hard).

    It can only be solved in polynomial time with an approximation algorithm that comes close to the optimal solution, unless a proof that P = NP exists.
  • Fragile deployment. Inspired by the above deployment problem, I also came up with the opposite problem (as my own "invention") -- how can we make any connection between a service a true network link (not local), so that we can test a system for robustness, using a minimal amount of machines?

    This problem can be modeled as a graph coloring problem (that is a NP-hard problem as well). I used one of approximatation alogithms described in the paper: "New Methods to Color the Vertices of a Graph" by D. Brélaz to implement a solution.

To work with these graph-based algorithms, I originally did not apply any transformations -- because of time pressure, I directly worked with objects from the Disnix models (e.g. services, target machines) and somewhat "glued" these together with generic data structures, such as lists and hash tables.

As a result, when looking at the implementation, it is very hard to get an understanding of the process and how an implementation aspect relates to a concept described in the papers shown above.

In my revised version, I have implemented a general purpose graph library that can be used to solve all kinds of general graph related problems.

Aside from using a general graph library, I have also separated the graph-based generation processes into the following steps:

  • After opening the Disnix input models (such as the services, infrastructure, and distribution models) I transform the models to a graph representing an instance of the problem domain.
  • After the graph has been generated, I apply the approximation algorithm to the graph data structure.
  • Finally, I transform the resolved graph back to a distribution model that should provide our desired distribution outcome.

This new organization provides better separation of concerns, common concepts can be reused (such as graph operations), and as a result, the implementations are much closer to the approximation algorithms described in the papers.

Visualizing the generation process


Another advantage of having a reusable graph implementation is that we can easily extend it to visualize the problem graphs.

When I combine these features together with my earlier work that visualizes services models, and a new tool that visualizes infrastructure models, I can make the entire generation process transparent.

For example, the following services model:


{system, pkgs, distribution, invDistribution}:

let
customPkgs = import ./pkgs { inherit pkgs system; };
in
rec {
testService1 = {
name = "testService1";
pkg = customPkgs.testService1;
type = "echo";
};

testService2 = {
name = "testService2";
pkg = customPkgs.testService2;
dependsOn = {
inherit testService1;
};
type = "echo";
};

testService3 = {
name = "testService3";
pkg = customPkgs.testService3;
dependsOn = {
inherit testService1 testService2;
};
type = "echo";
};
}

can be visualized as follows:


$ dydisnix-visualize-services -s services.nix


The above services model and corresponding visualization capture the following properties:

  • They describe three services (as denoted by ovals).
  • The arrows denote inter-dependency relationships (the dependsOn attribute in the services model).

    When a service has an inter-dependency on another service means that the latter service has to be activated first, and that the dependent service needs to know how to reach the former.

    testService2 depends on testService1 and testService3 depends on both the other two services.

We can also visualize the following infrastructure model:


{
testtarget1 = {
properties = {
hostname = "testtarget1";
};
containers = {
mysql-database = {
mysqlPort = 3306;
};
echo = {};
};
};

testtarget2 = {
properties = {
hostname = "testtarget2";
};
containers = {
mysql-database = {
mysqlPort = 3306;
};
};
};

testtarget3 = {
properties = {
hostname = "testtarget3";
};
};
}

with the following command:


$ dydisnix-visualize-infra -i infrastructure.nix

resulting in the following visualization:


The above infrastructure model declares three machines. Each target machine provides a number of container services (such as a MySQL database server, and echo that acts as a testing container).

With the following command, we can generate a problem instance for the graph coloring problem using the above services and infrastructure models as inputs:


$ dydisnix-graphcol -s services.nix -i infrastructure.nix \
--output-graph

resulting in the following graph:


The graph shown above captures the following properties:

  • Each service translates to a node
  • When an inter-dependency relationship exists between services, it gets translated to a (bi-directional) link representing a network connection (the rationale is that a service that has an inter-dependency on another service, interact with each other by using a network connection).

Each target machine translates to a color, that we can represent with a numeric index -- 0 is testtarget1, 1 is testtarget2 and so on.

The following command generates the resolved problem instance graph in which each vertex has a color assigned:


$ dydisnix-graphcol -s services.nix -i infrastructure.nix \
--output-resolved-graph

resulting in the following visualization:


(As a sidenote: in the above graph, colors are represented by numbers. In theory, I could also use real colors, but if I also want that the graph to remain visually appealing, I need to solve a color picking problem, which is beyond the scope of my refactoring objective).

The resolved graph can be translated back into the following distribution model:


$ dydisnix-graphcol -s services.nix -i infrastructure.nix
{
"testService2" = [
"testtarget2"
];
"testService1" = [
"testtarget1"
];
"testService3" = [
"testtarget3"
];
}

As you may notice, every service is distributed to a separate machine, so that every network link between a service is a real network connection between machines.

We can also visualize the problem instance of the multiway cut problem. For this, we also need a distribution model that, declares for each service, which target machine is a candidate.

The following distribution model makes all three target machines in the infrastructure model a candidate for every service:


{infrastructure}:

{
testService1 = [ infrastructure.testtarget1 infrastructure.testtarget2 infrastructure.testtarget3 ];
testService2 = [ infrastructure.testtarget1 infrastructure.testtarget2 infrastructure.testtarget3 ];
testService3 = [ infrastructure.testtarget1 infrastructure.testtarget2 infrastructure.testtarget3 ];
}

With the following command we can generate a problem instance representing a host-application graph:


$ dydisnix-multiwaycut -s services.nix -i infrastructure.nix \
-d distribution.nix --output-graph

providing me the following output:


The above problem graph has the following properties:

  • Each service translates to an app node (prefixed with app:) and each candidate target machine to a host node (prefixed with host:).
  • When a network connection between two services exists (implicitly derived from having an inter-dependency relationship), an edge is generated with a weight of 1.
  • When a target machine is a candidate target for a service, then an edge is generated with a weight of n2 representing a very large number.

The objective of solving the multiway cut problem is to cut edges in the graph in such a way that each terminal (host node) is disconnected from the other terminals (host nodes), in which the total weight of the cuts is minimized.

When applying the approximation algorithm in the paper to the above graph:


$ dydisnix-multiwaycut -s services.nix -i infrastructure.nix \
-d distribution.nix --output-resolved-graph

we get the following resolved graph:


that can be transformed back into the following distribution model:


$ dydisnix-multiwaycut -s services.nix -i infrastructure.nix \
-d distribution.nix
{
"testService2" = [
"testtarget1"
];
"testService1" = [
"testtarget1"
];
"testService3" = [
"testtarget1"
];
}

As you may notice by looking at the resolved graph (in which the terminals: testtarget2 and testtarget3 are disconnected) and the distribution model output, all services are distributed to the same machine: testtarget1 making all connections between the services local connections.

In this particular case, the solution is not only close to the optimal solution, but it is the optimal solution.

Conclusion


In this blog post, I have described how I have revised the deployment planning algorithm implementations in the Dynamic Disnix toolset. Their concerns are now much better separated, and the graph-based algorithms now use a general purpose graph library, that can also be used for generating visualizations of the intermediate steps in the generation process.

This revision was not on my short-term planned features list, but I am happy that I did the work. Retrospectively, I regret that I never took the time to finish things up properly after the submission of the paper. Although Dynamic Disnix's quality is still not where I want it to be, it is quite a step forward in making the toolset more usable.

Sadly, it is almost 10 years ago that I started Dynamic Disnix and still there is no offical release yet and the technical debt in Dynamic Disnix is one of the important reasons that I never did an official release. Hopefully, with this step I can do it some day. :-)

The good news is that I made the paper submission deadline and that the paper got accepted for presentation. It brought me to the SEAMS 2011 conference (co-located with ICSE 2011) in Honolulu, Hawaii, allowing me to take pictures such as this one:


Availability


The graph library and new implementations of the deployment planning algorithms described in this blog post are part of the current development version of Dynamic Disnix.

The paper: "A Self-Adaptive Deployment Framework for Service-Oriented Systems" describes the Dynamic Disnix framework (developed 9 years ago) and can be obtained from my publications page.

Acknowledgements


To generate the visualizations I used the Graphviz toolset.

by Sander van der Burg (noreply@blogger.com) at October 08, 2020 09:29 PM

October 01, 2020

Cachix

Changes to Garbage Collection

Based on your feedback, I have made the following two changes: When downloading <store-hash>.narinfo the timestamp of last access is updated, previously this would happen only with nar archives. This change allows tools like nix-build-uncached to prevent unneeded downloads and playing nicely with Cachix garbage collection algorithm! Previously, the algorithm ordered paths first by last accessed timestamp and then by creation timestamp. That worked well until you had all entries with last accessed and all newly created store paths will get deleted first.

by Domen Kožar (support@cachix.org) at October 01, 2020 09:00 AM

September 30, 2020

Tweag I/O

Fully statically linked Haskell binaries with Bazel

Deploying and packaging Haskell applications can be challenging at times, and runtime library dependencies are one reason for this. Statically linked binaries have no such dependencies and are therefore easier to deploy. They can also be quicker to start, since no dynamic loading is needed. In exchange, all used symbols must be bundled into the application, which may lead to larger artifacts.

Thanks to the contribution of Will Jones of Habito1, rules_haskell, the Haskell Bazel extension, has gained support for fully static linking of Haskell binaries.

Habito uses Bazel to develop, build, test and deploy Haskell code in a minimal Docker container. By building fully-statically-linked binaries, Docker packaging (using rules_docker) becomes straightforward and easy to integrate into existing build workflows. A static binary can also be stripped once it is built to reduce the size of production artifacts. With static binaries, what you see (just the binary) is what you get, and this is powerful.

In the following, we will discuss the technical challenges of statically linking Haskell binaries and how these challenges are addressed in rules_haskell. Spoiler alert: Nix is an important part of the solution. Finally, we will show you how you can create your own fully statically linked Haskell binaries with Bazel and Nix.

Technical challenges

Creating fully statically linked Haskell binaries is not without challenges. The main difficulties for doing so are:

  • Not all library dependencies are suited for statically linked binaries.
  • Compiling template Haskell requires dynamic libraries on Linux by default.

Library dependencies

Like most binaries on Linux, the Haskell compiler GHC is typically configured to link against the GNU C library glibc. However, glibc is not designed to support fully static linking and explicitly depends on dynamic linking in some use cases. The alternative C library musl is designed to support fully static linking.

Relatedly, there may be licensing reasons to not link some libraries statically. Common instances in the Haskell ecosystem are again glibc which is licensed under GPL, and the core Haskell dependency libgmp which is licensed under LGPL. For the latter GHC can be configured to use the core package integer-simple instead of integer-gmp.

Fortunately, the Nix community has made great progress towards fully statically linked Haskell binaries and we can build on much of this work in rules_haskell. The rules_nixpkgs extension makes it possible to import Nix derivations into a Bazel project, and rules_haskell has first class support for Nix-provided GHC toolchains using rules_nixpkgs under the hood. In particular, it can import a GHC toolchain based on musl from static-haskell-nix.

Template Haskell

By default GHC is configured to require dynamic libraries when compiling template Haskell. GHC’s runtime system (RTS) can be built in various combinations of so called ways. The relevant way in this context is called dynamic. On Linux, GHC itself is built with a dynamic RTS. However, statically linked code is targeting a non-dynamic RTS. This may sound familiar if you ever tried to compile code using template Haskell in profiling mode. As the GHC user guide points out, when evaluating template Haskell splices, GHC will execute compiled expressions in its built-in bytecode interpreter and this code has to be compatible with the RTS of GHC itself. In short, a GHC configured with a dynamic RTS will not be able to load static Haskell libraries to evaluate template Haskell splices.

One way to solve this issue is to compile all Haskell libraries twice, once with dynamic linking and once with static linking. C library dependencies will similarly need to be available in both static and dynamic forms. This is the approach taken by static-haskell-nix. However, in the context of Bazel we found it preferable to only compile Haskell libraries once in static form and also only have to provide C libraries in static form. To achieve this we need to build GHC with a static RTS and to make sure that Haskell code is compiled as position independent code so that it can be loaded into a running GHC for template Haskell splices. Thanks to Nix, it is easy to override the GHC derivation to include the necessary configuration.

Make your project fully statically linked

How can you benefit from this? In this section we will show how you can setup a Bazel Haskell project for fully static linking with Nix. For further details please refer to the corresponding documentation on haskell.build. A fully working example repository is available here. For a primer on setting up a Bazel Haskell project take a look at this tutorial.

First, you need to configure a Nixpkgs repository that defines a GHC toolchain for fully static linking based on musl. We start by pulling in a base Nixpkgs revision and the static-haskell-nix project. Create a default.nix, with the following.

let
  baseNixpkgs = builtins.fetchTarball {
    name = "nixos-nixpkgs";
    url = "https://github.com/NixOS/nixpkgs/archive/dca182df882db483cea5bb0115fea82304157ba1.tar.gz";
    sha256 = "0193bpsg1ssr93ihndyv7shz6ivsm8cvaxxl72mc7vfb8d1bwx55";
  };

  staticHaskellNixpkgs = builtins.fetchTarball
    "https://github.com/nh2/static-haskell-nix/archive/dbce18f4808d27f6a51ce31585078b49c86bd2b5.tar.gz";
in

Then we import a Haskell package set based on musl from static-haskell-nix. The package set provides GHC and various Haskell packages. However, we will only use the GHC compiler and use Bazel to build other Haskell packages.

let
  staticHaskellPkgs = (
    import (staticHaskellNixpkgs + "/survey/default.nix") {}
  ).approachPkgs;
in

Next we define a Nixpkgs overlay that introduces a GHC based on musl that is configured to use a static runtime system and core packages built with position independent code so that they can be loaded for template Haskell.

let
  overlay = self: super: {
    staticHaskell = staticHaskellPkgs.extend (selfSH: superSH: {
      ghc = (superSH.ghc.override {
        enableRelocatedStaticLibs = true;
        enableShared = false;
      }).overrideAttrs (oldAttrs: {
        preConfigure = ''
          ${oldAttrs.preConfigure or ""}
          echo "GhcLibHcOpts += -fPIC -fexternal-dynamic-refs" >> mk/build.mk
          echo "GhcRtsHcOpts += -fPIC -fexternal-dynamic-refs" >> mk/build.mk
        '';
      });
    });
  };
in

Finally, we extend the base Nixpkgs revision with the overlay. This makes the newly configured GHC available under the Nix attribute path staticHaskell.ghc.

  args@{ overlays ? [], ... }:
    import baseNixpkgs (args // {
      overlays = [overlay] ++ overlays;
    })

This concludes the Nix part of the setup and we can move on to the Bazel part.

You can import this Nixpkgs repository into Bazel by adding the following lines to your WORKSPACE file.

load(
    "@io_tweag_rules_nixpkgs//nixpkgs:nixpkgs.bzl",
    "nixpkgs_local_repository",
)
nixpkgs_local_repository(
    name = "nixpkgs",
    nix_file = "default.nix",
)

Now you can define a GHC toolchain for rules_haskell that uses the Nix built GHC defined above. Note how we declare that this toolchain has a static RTS and is configured for fully static linking. Add the following lines to your WORKSPACE file.

load(
    "@rules_haskell//haskell:nixpkgs.bzl",
    "haskell_register_ghc_nixpkgs",
)
haskell_register_ghc_nixpkgs(
    version = "X.Y.Z",  # Make sure this matches the GHC version.
    attribute_path = "staticHaskell.ghc",
    repositories = {"nixpkgs": "@nixpkgs"},
    static_runtime = True,
    fully_static_link = True,
)

GHC relies on the C compiler and linker during compilation. rules_haskell will always use the C compiler and linker provided by the active Bazel C toolchain. We need to make sure that we use a musl-based C toolchain as well. Here we will use the same Nix-provided C toolchain that is used by static-haskell-nix to build GHC.

load(
    "@io_tweag_rules_nixpkgs//nixpkgs:nixpkgs.bzl",
    "nixpkgs_cc_configure",
)
nixpkgs_cc_configure(
    repository = "@nixpkgs",
    nix_file_content = """
      with import <nixpkgs> { config = {}; overlays = []; }; buildEnv {
        name = "bazel-cc-toolchain";
        paths = [ staticHaskell.stdenv.cc staticHaskell.binutils ];
      }
    """,
)

Finally, everything is configured for fully static linking. You can define a Bazel target for a fully statically linked Haskell binary as follows.

haskell_binary(
    name = "example",
    srcs = ["Main.hs"],
    features = ["fully_static_link"],
)

You can build your binary and confirm that it is fully statically linked as follows.

$ bazel build //:example
$ ldd bazel-bin/example
      not a dynamic executable

Conclusion

If you’re interested in further exploring the benefits of fully statically linked binaries, you might combine them with rules_docker (e.g. through its container_image rule) to build Docker images as Habito have done. With a rich enough set of Bazel rules and dependency specifications, it’s possible to reduce your build and deployment workflow to a bazel test and bazel run!

The current implementation depends on a Nix-provided GHC toolchain capable of fully static linking that is imported into Bazel using rules_nixpkgs. However, there is no reason why it shouldn’t be possible to use a GHC distribution capable of fully static linking that was provided by other means, for example a Docker image such as ghc-musl. Get in touch if you would like to create fully statically linked Haskell binaries with Bazel but can’t or don’t want to integrate Nix into your build. Contributions are welcome!

We thank Habito for their contributions to rules_haskell.


  1. Habito is fixing mortgages and making homebuying fit for the future. Habito gives people tools, jargon-free knowledge and expert support to help them buy and finance their homes. Built on a rich foundation of functional programming and other cutting-edge technology, Habito is a long time user of and contributor to rules_haskell.

September 30, 2020 12:00 AM

September 24, 2020

Sander van der Burg

Assigning unique IDs to services in Disnix deployment models

As described in some of my recent blog posts, one of the more advanced features of Disnix as well as the experimental Nix process management framework is to deploy multiple instances of the same service to the same machine.

To make running multiple service instances on the same machine possible, these tools rely on conflict avoidance rather than isolation (typically used for containers). To allow multiple services instances to co-exist on the same machine, they need to be configured in such a way that they do not allocate any conflicting resources.

Although for small systems it is doable to configure multiple instances by hand, this process gets tedious and time consuming for larger and more technologically diverse systems.

One particular kind of conflicting resource that could be configured automatically are numeric IDs, such as TCP/UDP port numbers, user IDs (UIDs), and group IDs (GIDs).

In this blog post, I will describe how multiple service instances are configured (in Disnix and the process management framework) and how we can automatically assign unique numeric IDs to them.

Configuring multiple service instances


To facilitate conflict avoidance in Disnix and the Nix process management framework, services are configured as follows:


{createManagedProcess, tmpDir}:
{port, instanceSuffix ? "", instanceName ? "webapp${instanceSuffix}"}:

let
webapp = import ../../webapp;
in
createManagedProcess {
name = instanceName;
description = "Simple web application";
inherit instanceName;

# This expression can both run in foreground or daemon mode.
# The process manager can pick which mode it prefers.
process = "${webapp}/bin/webapp";
daemonArgs = [ "-D" ];

environment = {
PORT = port;
PID_FILE = "${tmpDir}/${instanceName}.pid";
};
user = instanceName;
credentials = {
groups = {
"${instanceName}" = {};
};
users = {
"${instanceName}" = {
group = instanceName;
description = "Webapp";
};
};
};

overrides = {
sysvinit = {
runlevels = [ 3 4 5 ];
};
};
}

The Nix expression shown above is a nested function that describes how to deploy a simple self-contained REST web application with an embedded HTTP server:

  • The outer function header (first line) specifies all common build-time dependencies and configuration properties that the service needs:

    • createManagedProcess is a function that can be used to define process manager agnostic configurations that can be translated to configuration files for a variety of process managers (e.g. systemd, launchd, supervisord etc.).
    • tmpDir refers to the temp directory in which temp files are stored.
  • The inner function header (second line) specifies all instance parameters -- these are the parameters that must be configured in such a way that conflicts with other process instances are avoided:

    • The instanceName parameter (that can be derived from the instanceSuffix) is a value used by some of the process management backends (e.g. the ones that invoke the daemon command) to derive a unique PID file for the process. When running multiple instances of the same process, each of them requires a unique PID file name.
    • The port parameter specifies to which TCP port the service binds to. Binding the service to a port that is already taken by another service, causes the deployment of this service to fail.
  • In the function body, we invoke the createManagedProcess function to construct configuration files for all supported process manager backends to run the webapp process:

    • As explained earlier, the instanceName is used to configure the daemon executable in such a way that it allocates a unique PID file.
    • The process parameter specifies which executable we need to run, both as a foreground process or daemon.
    • The daemonArgs parameter specifies which command-line parameters need to be propagated to the executable when the process should daemonize on its own.
    • The environment parameter specifies all environment variables. The webapp service uses these variables for runtime property configuration.
    • The user parameter is used to specify that the process should run as an unprivileged user. The credentials parameter is used to configure the creation of the user account and corresponding user group.
    • The overrides parameter is used to override the process manager-agnostic parameters with process manager-specific parameters. For the sysvinit backend, we configure the runlevels in which the service should run.

Although the convention shown above makes it possible to avoid conflicts (assuming that all potential conflicts have been identified and exposed as function parameters), these parameters are typically configured manually:


{ pkgs, system
, stateDir ? "/var"
, runtimeDir ? "${stateDir}/run"
, logDir ? "${stateDir}/log"
, cacheDir ? "${stateDir}/cache"
, tmpDir ? (if stateDir == "/var" then "/tmp" else "${stateDir}/tmp")
, forceDisableUserChange ? false
, processManager ? "sysvinit"
, ...
}:

let
constructors = import ./constructors.nix {
inherit pkgs stateDir runtimeDir logDir tmpDir forceDisableUserChange processManager;
};

processType = import ../../nixproc/derive-dysnomia-process-type.nix {
inherit processManager;
};
in
rec {
webapp1 = rec {
name = "webapp1";
port = 5000;
dnsName = "webapp.local";
pkg = constructors.webapp {
inherit port;
instanceSuffix = "1";
};
type = processType;
};

webapp2 = rec {
name = "webapp2";
port = 5001;
dnsName = "webapp.local";
pkg = constructors.webapp {
inherit port;
instanceSuffix = "2";
};
type = processType;
};
}

The above Nix expression shows both a valid Disnix services as well as a valid processes model that composes two web application process instances that can run concurrently on the same machine by invoking the nested constructor function shown in the previous example:

  • Each webapp instance has its own unique instance name, by specifying a unique numeric instanceSuffix that gets appended to the service name.
  • Every webapp instance binds to a unique TCP port (5000 and 5001) that should not conflict with system services or other process instances.

Previous work: assigning port numbers


Although configuring two process instances is still manageable, the configuration process becomes more tedious and time consuming when the amount and the kind of processes (each having their own potential conflicts) grow.

Five years ago, I already identified a resource that could be automatically assigned to services: port numbers.

I have created a very simple port assigner tool that allows you to specify a global ports pool and a target-specific pool pool. The former is used to assign globally unique port numbers to all services in the network, whereas the latter assigns port numbers that are unique to the target machine where the service is deployed to (this is to cope with the scarcity of port numbers).

Although the tool is quite useful for systems that do not consist of too many different kinds of components, I ran into a number limitations when I want to manage a more diverse set of services:

  • Port numbers are not the only numeric IDs that services may require. When deploying systems that consist of self-contained executables, you typically want to run them as unprivileged users for security reasons. User accounts on most UNIX-like systems require unique user IDs, and the corresponding users' groups require unique group IDs.
  • We typically want to manage multiple resource pools, for a variety of reasons. For example, when we have a number of HTTP server instances and a number of database instances, then we may want to pick port numbers in the 8000-9000 range for the HTTP servers, whereas for the database servers we want to use a different pool, such as 5000-6000.

Assigning unique numeric IDs


To address these shortcomings, I have developed a replacement tool that acts as a generic numeric ID assigner.

This new ID assigner tool works with ID resource configuration files, such as:


rec {
ports = {
min = 5000;
max = 6000;
scope = "global";
};

uids = {
min = 2000;
max = 3000;
scope = "global";
};

gids = uids;
}

The above ID resource configuration file (idresources.nix) defines three resource pools: ports is a resource that represents port numbers to be assigned to the webapp processes, uids refers to user IDs and gids to group IDs. The group IDs' resource configuration is identical to the users' IDs configuration.

Each resource attribute refers the following configuration properties:

  • The min value specifies the minimum ID to hand out, max the maximum ID.
  • The scope value specifies the scope of the resource pool. global (which is the default option) means that the IDs assigned from this resource pool to services are globally unique for the entire system.

    The machine scope can be used to assign IDs that are unique for the machine where a service is distributed to. When the latter option is used, services that are distributed two separate machines may have the same ID.

We can adjust the services/processes model in such a way that every service will use dynamically assigned IDs and that each service specifies for which resources it requires a unique ID:


{ pkgs, system
, stateDir ? "/var"
, runtimeDir ? "${stateDir}/run"
, logDir ? "${stateDir}/log"
, cacheDir ? "${stateDir}/cache"
, tmpDir ? (if stateDir == "/var" then "/tmp" else "${stateDir}/tmp")
, forceDisableUserChange ? false
, processManager ? "sysvinit"
, ...
}:

let
ids = if builtins.pathExists ./ids.nix then (import ./ids.nix).ids else {};

constructors = import ./constructors.nix {
inherit pkgs stateDir runtimeDir logDir tmpDir forceDisableUserChange processManager ids;
};

processType = import ../../nixproc/derive-dysnomia-process-type.nix {
inherit processManager;
};
in
rec {
webapp1 = rec {
name = "webapp1";
port = ids.ports.webapp1 or 0;
dnsName = "webapp.local";
pkg = constructors.webapp {
inherit port;
instanceSuffix = "1";
};
type = processType;
requiresUniqueIdsFor = [ "ports" "uids" "gids" ];
};

webapp2 = rec {
name = "webapp2";
port = ids.ports.webapp2 or 0;
dnsName = "webapp.local";
pkg = constructors.webapp {
inherit port;
instanceSuffix = "2";
};
type = processType;
requiresUniqueIdsFor = [ "ports" "uids" "gids" ];
};
}

In the above services/processes model, we have made the following changes:

  • In the beginning of the expression, we import the dynamically generated ids.nix expression that provides ID assignments for each resource. If the ids.nix file does not exists, we generate an empty attribute set. We implement this construction (in which the absence of ids.nix can be tolerated) to allow the ID assigner to bootstrap the ID assignment process.
  • Every hardcoded port attribute of every service is replaced by a reference to the ids attribute set that is dynamically generated by the ID assigner tool. To allow the ID assigner to open the services model in the first run, we provide a fallback port value of 0.
  • Every service specifies for which resources it requires a unique ID through the requiresUniqueIdsFor attribute. In the above example, both service instances require unique IDs to assign a port number, user ID to the user and group ID to the group.

The port assignments are propagated as function parameters to the constructor functions that configure the services (as shown earlier in this blog post).

We could also implement a similar strategy with the UIDs and GIDs, but a more convenient mechanism is to compose the function that creates the credentials, so that it transparently uses our uids and gids assignments.

As shown in the expression above, the ids attribute set is also propagated to the constructors expression. The constructors expression indirectly composes the createCredentials function as follows:


{pkgs, ids ? {}, ...}:

{
createCredentials = import ../../create-credentials {
inherit (pkgs) stdenv;
inherit ids;
};

...
}

The ids attribute set is propagated to the function that composes the createCredentials function. As a result, it will automatically assign the UIDs and GIDs in the ids.nix expression when the user configures a user or group with a name that exists in the uids and gids resource pools.

To make these UIDs and GIDs assignments go smoothly, it is recommended to give a process instance the same process name, instance name, user and group names.

Using the ID assigner tool


By combining the ID resources specification with the three Disnix models: a services model (that defines all distributable services, shown above), an infrastructure model (that captures all available target machines) and their properties and a distribution model (that maps services to target machines in the network), we can automatically generate an ids configuration that contains all ID assignments:


$ dydisnix -s services.nix -i infrastructure.nix -d distribution.nix \
--id-resources idresources.nix --output-file ids.nix

The above command will generate an ids configuration file (ids.nix) that provides, for each resource in the ID resources model, a unique assignment to services that are distributed to a target machine in the network. (Services that are not distributed to any machine in the distribution model will be skipped, to not waste too many resources).

The output file (ids.nix) has the following structure:


{
"ids" = {
"gids" = {
"webapp1" = 2000;
"webapp2" = 2001;
};
"uids" = {
"webapp1" = 2000;
"webapp2" = 2001;
};
"ports" = {
"webapp1" = 5000;
"webapp2" = 5001;
};
};
"lastAssignments" = {
"gids" = 2001;
"uids" = 2001;
"ports" = 5001;
};
}

  • The ids attribute contains for each resource (defined in the ID resources model) the unique ID assignments per service. As shown earlier, both service instances require unique IDs for ports, uids and gids. The above attribute set stores the corresponding ID assignments.
  • The lastAssignments attribute memorizes the last ID assignment per resource. Once an ID is assigned, it will not be immediately reused. This is to allow roll backs and to prevent data to incorrectly get owned by the wrong user accounts. Once the maximum ID limit is reached, the ID assigner will start searching for a free assignment from the beginning of the resource pool.

In addition to assigning IDs to services that are distributed to machines in the network, it is also possible to assign IDs to all services (regardless whether they have been deployed or not):


$ dydisnix -s services.nix \
--id-resources idresources.nix --output-file ids.nix

Since the above command does not know anything about the target machines, it only works with an ID resources configuration that defines global scope resources.

When you intend to upgrade an existing deployment, you typically want to retain already assigned IDs, while obsolete ID assignment should be removed, and new IDs should be assigned to services that have none yet. This is to prevent unnecessary redeployments.

When removing the first webapp service and adding a third instance:


{ pkgs, system
, stateDir ? "/var"
, runtimeDir ? "${stateDir}/run"
, logDir ? "${stateDir}/log"
, cacheDir ? "${stateDir}/cache"
, tmpDir ? (if stateDir == "/var" then "/tmp" else "${stateDir}/tmp")
, forceDisableUserChange ? false
, processManager ? "sysvinit"
, ...
}:

let
ids = if builtins.pathExists ./ids.nix then (import ./ids.nix).ids else {};

constructors = import ./constructors.nix {
inherit pkgs stateDir runtimeDir logDir tmpDir forceDisableUserChange processManager ids;
};

processType = import ../../nixproc/derive-dysnomia-process-type.nix {
inherit processManager;
};
in
rec {
webapp2 = rec {
name = "webapp2";
port = ids.ports.webapp2 or 0;
dnsName = "webapp.local";
pkg = constructors.webapp {
inherit port;
instanceSuffix = "2";
};
type = processType;
requiresUniqueIdsFor = [ "ports" "uids" "gids" ];
};

webapp3 = rec {
name = "webapp3";
port = ids.ports.webapp3 or 0;
dnsName = "webapp.local";
pkg = constructors.webapp {
inherit port;
instanceSuffix = "3";
};
type = processType;
requiresUniqueIdsFor = [ "ports" "uids" "gids" ];
};
}

And running the following command (that provides the current ids.nix as a parameter):


$ dydisnix -s services.nix -i infrastructure.nix -d distribution.nix \
--id-resources idresources.nix --ids ids.nix --output-file ids.nix

we will get the following ID assignment configuration:


{
"ids" = {
"gids" = {
"webapp2" = 2001;
"webapp3" = 2002;
};
"uids" = {
"webapp2" = 2001;
"webapp3" = 2002;
};
"ports" = {
"webapp2" = 5001;
"webapp3" = 5002;
};
};
"lastAssignments" = {
"gids" = 2002;
"uids" = 2002;
"ports" = 5002;
};
}

As may be observed, since the webapp2 process is in both the current and the previous configuration, its ID assignments will be retained. webapp1 gets removed because it is no longer in the services model. webapp3 gets the next numeric IDs from the resources pools.

Because the configuration of webapp2 stays the same, it does not need to be redeployed.

The models shown earlier are valid Disnix services models. As a consequence, they can be used with Dynamic Disnix's ID assigner tool: dydisnix-id-assign.

Although these Disnix services models are also valid processes models (used by the Nix process management framework) not every processes model is guaranteed to be compatible with a Disnix service model.

For process models that are not compatible, it is possible to use the nixproc-id-assign tool that acts as a wrapper around dydisnix-id-assign tool:


$ nixproc-id-assign --id-resources idresources.nix processes.nix

Internally, the nixproc-id-assign tool converts a processes model to a Disnix service model (augmenting the process instance objects with missing properties) and propagates it to the dydisnix-id-assign tool.

A more advanced example


The webapp processes example is fairly trivial and only needs unique IDs for three kinds of resources: port numbers, UIDs, and GIDs.

I have also developed a more complex example for the Nix process management framework that exposes several commonly used system services on Linux systems, such as:


{ pkgs ? import <nixpkgs> { inherit system; }
, system ? builtins.currentSystem
, stateDir ? "/var"
, runtimeDir ? "${stateDir}/run"
, logDir ? "${stateDir}/log"
, cacheDir ? "${stateDir}/cache"
, tmpDir ? (if stateDir == "/var" then "/tmp" else "${stateDir}/tmp")
, forceDisableUserChange ? false
, processManager
}:

let
ids = if builtins.pathExists ./ids.nix then (import ./ids.nix).ids else {};

constructors = import ./constructors.nix {
inherit pkgs stateDir runtimeDir logDir tmpDir cacheDir forceDisableUserChange processManager ids;
};
in
rec {
apache = rec {
port = ids.httpPorts.apache or 0;

pkg = constructors.simpleWebappApache {
inherit port;
serverAdmin = "root@localhost";
};

requiresUniqueIdsFor = [ "httpPorts" "uids" "gids" ];
};

postgresql = rec {
port = ids.postgresqlPorts.postgresql or 0;

pkg = constructors.postgresql {
inherit port;
};

requiresUniqueIdsFor = [ "postgresqlPorts" "uids" "gids" ];
};

influxdb = rec {
httpPort = ids.influxdbPorts.influxdb or 0;
rpcPort = httpPort + 2;

pkg = constructors.simpleInfluxdb {
inherit httpPort rpcPort;
};

requiresUniqueIdsFor = [ "influxdbPorts" "uids" "gids" ];
};
}

The above processes model exposes three service instances: an Apache HTTP server (that works with a simple configuration that serves web applications from a single virtual host), PostgreSQL and InfluxDB. Each service requires a unique user ID and group ID so that their privileges are separated.

To make these services more accessible/usable, we do not use a shared ports resource pool. Instead, each service type consumes port numbers from their own resource pools.

The following ID resources configuration can be used to provision the unique IDs to the services above:


rec {
uids = {
min = 2000;
max = 3000;
};

gids = uids;

httpPorts = {
min = 8080;
max = 8085;
};

postgresqlPorts = {
min = 5432;
max = 5532;
};

influxdbPorts = {
min = 8086;
max = 8096;
step = 3;
};
}


The above ID resources configuration defines a shared UIDs and GIDs resource pool, but separate ports resource pools for each service type. This has the following implications if we deploy multiple instances of each service type:

  • All Apache HTTP server instances get a TCP port assignment between 8080-8085.
  • All PostgreSQL server instances get a TCP port assignment between 5432-5532.
  • All InfluxDB server instances get a TCP port assignment between 8086-8096. Since an InfluxDB allocates two port numbers: one for the HTTP server and one for the RPC service (the latter's port number is the base port number + 2). We use a step count of 3 so that we can retain this convention for each InfluxDB instance.

Conclusion


In this blog post, I have described a new tool: dydisnix-id-assign that can be used to automatically assign unique numeric IDs to services in Disnix service models.

Moreover, I have described: nixproc-id-assign that acts a thin wrapper around this tool to automatically assign numeric IDs to services in the Nix process management framework's processes model.

This tool replaces the old dydisnix-port-assign tool in the Dynamic Disnix toolset (described in the blog post written five years ago) that is much more limited in its capabilities.

Availability


The dydisnix-id-assign tool is available in the current development version of Dynamic Disnix. The nixproc-id-assign is part of the current implementation of the Nix process management framework prototype.

by Sander van der Burg (noreply@blogger.com) at September 24, 2020 06:24 PM

September 16, 2020

Tweag I/O

Implicit Dependencies in Build Systems

In making a build system for your software, you codified the dependencies between its parts. But, did you account for implicit software dependencies, like system libraries and compiler toolchains?

Implicit dependencies give rise to the biggest and most common problem with software builds - the lack of hermiticity. Without hermetic builds, reproducibility and cacheability are lost.

This post motivates the desire for reproducibility and cacheability, and explains how we achieve hermetic, reproducible, highly cacheable builds by taking control of implicit dependencies.

Reproducibility

Consider a developer newly approaching a code repository. After cloning the repo, the developer must install a long list of “build requirements” and plod through multiple steps of “setup”, only to find that, yes indeed, the build fails. Yet, it worked just fine for their colleague! The developer, typically not expert in build tooling, must debug the mysterious failure not of their making. This is bad for morale and for productivity.

This happens because the build is not reproducible.

One very common reason for the failure is that the compiler toolchain on the developer’s system is different from that of the colleague. This happens even with build systems that use sophisticated build software, like Bazel. Bazel implicitly uses whatever system libraries and compilers are currently installed in the developer’s environment.

A common workaround is to provide developers with a Docker image equipped with a certain compiler toolchain and system libraries, and then to mandate that the Bazel build occurs in that context.

That solution has a number of drawbacks. First, if the developer is using macOS, the virtualized build context runs substantially slower. Second, the Bazel build cache, developer secrets, and the source code remain outside of the image and this adds complexity to the Docker invocation. Third, the Docker image must be rebuilt and redistributed as dependencies change and that’s extra maintenance. Fourth, and this is the biggest issue, Docker image builds are themselves not reproducible - they nearly always rely on some external state that does not remain constant across build invocations, and that means the build can fail for reasons unrelated to the developer’s code.

A better solution is to use Nix to supply the compiler toolchain and system library dependencies. Nix is a software package management system somewhat like Debian’s APT or macOS’s Homebrew. Nix goes much farther to help developers control their environments. It is unsurpassed when it comes to reproducible builds of software packages.

Nix facilitates use of the Nixpkgs package set. That set is the largest single set of software packages. It is also the freshest package set. It provides build instructions that work both on Linux and macOS. Developers can easily pin any software package at an exact version.

Learn more about using Nix with Bazel, here.

Cacheability

Not only should builds be reproducible, but they should also be fast. Fast builds are achieved by caching intermediate build results. Cache entries are keyed based on the precise dependencies as well as the build instructions that produce the entries. Builds will only benefit from a (shared, distributed) cache when they have matching dependencies. Otherwise, cache keys (which depend on the precise dependencies) will be different, and there will be cache misses. This means that the developer will have to rebuild targets locally. These unnecessary local rebuilds slow development.

The solution is to make the implicit dependencies into explicit ones, again using Nix, making sure to configure and use a shared Nix cache.

Learn more about configuring a shared Bazel cache, here.

Conclusion

It is important to eliminate implicit dependencies in your build system in order to retain build reproducibility and cacheability. Identify Nix packages that can replace the implicit dependencies of your Bazel build and use rules_nixpkgs to declare them as explicit dependencies. That will yield a fast, correct, hermetic build.

September 16, 2020 12:00 AM

September 10, 2020

Tweag I/O

Towards a content-addressed model for Nix

This is my first post about content-addressability in Nix — a long-awaited feature that is hopefully coming soon! In this post I will show you how this feature will improve the Nix infrastructure. I’ll come back in another post to explain the technical challenges of adding content-addressability to Nix.

Nix has a wonderful model for handling packages. Because each derivation is stored under (aka addressed by) a unique name, multiple versions of the same library can coexist on the same system without issues: each version of the library has a distinct name, as far as Nix is concerned.

What’s more, if openssl is upgraded in Nixpkgs, Nix knows that all the packages that depend on openssl (i.e., almost everything) must be rebuilt, if only so that they point at the name of the new openssl version. This way, a Nix installation will never feature a package built for one version of openssl, but dynamically linked against another: as a user, it means that you will never have an undefined symbol error. Hurray!

The input-addressed store

How does Nix achieve this feat? The idea is that the name of a package is derived from all of its inputs (that is, the complete list of dependencies, as well as the package description). So if you change the git tag from which openssl is fetched, the name changes, if the name of openssl changes, then the name of any package which has openssl in its dependencies changes.

However this can be very pessimistic: even changes that aren’t semantically meaningful can imply mass rebuilding and downloading. As a slightly extreme example, this merge-request on Nixpkgs makes a tiny change to the way openssl is built. It doesn’t actually change openssl, yet requires rebuilding an insane amount of packages. Because, as far as Nix is concerned, all these packages have different names, hence are different packages. In reality, though, they weren’t.

Nevertheless, the cost of the rebuild has to be born by the Nix infrastructure: Hydra builds all packages to populate the cache, and all the newly built packages must be stored. It costs both time, and money (in cpu power, and storage space).

Unnecessary rebuilds?

Most distributions, by default, don’t rebuild packages when their dependencies change, and have a (more-or-less automated) process to detect changes that require rebuilding reverse dependencies. For example, Debian tries to detect ABI changes automatically and Fedora has a more manual process. But Nix doesn’t.

The issue is that the notion of a “breaking change” is a very fuzzy one. Should we follow Debian and consider that only ABI changes are breaking? This criterion only applies for shared libraries, and as the Debian policy acknowledges, only for “well-behaved” programs. So if we follow this criterion, there’s still need for manual curation, which is precisely what Nix tries to avoid.

The content-addressed model

Quite happily, there is a criterion to avoid many useless rebuilds without sacrificing correctness: detecting when changes in a package (or one of its dependencies) yields the exact same output. That might seem like an edge case, but the openssl example above (and many others) shows that there’s a practical application to it. As another example, go depends on perl for its tests, so an upgrade of perl requires rebuilding all the Go packages in Nixpkgs, although it most likely doesn’t change the output of the go derivation.

But, for Nix to recognise that a package is not a new package, the new, unchanged, openssl or go packages must have the same name as the old version. Therefore, the name of a package must not be derived from its inputs which have changed, but, instead, it should be derived from the content of the compiled package. This is called content addressing.

Content addressing is how you can be sure that when you and a colleague at the other side of the world type git checkout 7cc16bb8cd38ff5806e40b32978ae64d54023ce0 you actually have the exact same content in your tree. Git commits are content addressed, therefore the name 7cc16bb8cd38ff5806e40b32978ae64d54023ce0 refers to that exact tree.

Yet another example of content-addressed storage is IPFS. In IPFS storage files can be stored in any number of computers, and even moved from computer to computer. The content-derived name is used as a way to give an intrinsic name to a file, regardless of where it is stored.

In fact, even the particular use case that we are discussing here - avoiding recompilation when a rebuilt dependency hasn’t changed - can be found in various build systems such as Bazel. In build systems, such recompilation avoidance is sometimes known as the early cutoff optimization − see the build systems a la carte paper for example).

So all we need to do is to move the Nix store from an input-addressed model to a content-addressed model, as used by many tools already, and we will be able to save a lot of storage space and CPU usage, by rebuilding many fewer packages. Nixpkgs contributors will see their CI time improved. It could also allow serving a binary cache over IPFS.

Well, like many things with computers, this is actually way harder than it sounds (which explains why this hasn’t already been done despite being discussed nearly 15 years ago in the original paper), but we now believe that there’s a way forward… more on that in a later post.

Conclusion

A content-addressed store for Nix would help reduce the insane load that Hydra has to sustain. While content-addressing is a common technique both in distributed systems and build systems (Nix is both!), getting to the point where it was feasible to integrate content-addressing in Nix has been a long journey.

In a future post, I’ll explain why it was so hard, and how we finally managed to propose a viable design for a content-addressed Nix.

September 10, 2020 12:00 AM

September 01, 2020

Guillaume Maudoux

How to Digest Nix Hashes ?

They say there are two hard things in computing: cache invalidation and naming things. Alas, build systems fight against these two at the same time. Because caching build results is a central feature of most build systems, they are immediately concerned by cache invalidation issues. For naming things, it is less obvious. I used to understand the naming problem as related to concepts and source code variables. Finding the right name for a class, a function or a variable can be a real headache.

But it can also be difficult to generate a meaningful name for values manipulated by programs. Nix and a range of build systems have to forge unique and deterministic names for intermediate build results. These names are used as cache keys. In the case of Nix, the names are first class citizens as they are visible in the public store, in the form of store paths.

Did you ever wonder what’s in your Nix hashes? Or how they are computed? Two different projects led me to further investigate these questions. Implementing HNix store and shepherding the “Content addressed paths” RFC #62. In both cases, understanding how path names (and the other hashes) are generated took some time. Here is what I learned.

Store path hashes

The most visible digests in Nix appears in store path names. Lets take for example a pinned version of hello.

let
  nixpkgs = import (builtins.fetchTarball {
    url = "https://github.com/nixos/nixpkgs/archive/c59ea8b8a0e7f927e7291c14ea6cd1bd3a16ff38.tar.gz";
    sha256 = "1ak7jqx94fjhc68xh1lh35kh3w3ndbadprrb762qgvcfb8351x8v";
  }) {};
in
  nixpkgs.hello # => /nix/store/ab1pfk338f6gzpglsirxhvji4g9w558i-hello-2.10

Nix composes the hash part of the path by compressing to 32 base32 characters (160 bits or 20 bytes) a sha256 digest. Base32 encoding is unique to Nix. It uses digits and lower-case letters (except EOUT) for a total of 32 characters valid in a file name. The result is more dense than base16 while avoiding the strange characters of base64 (+, /, =) amongst which / would create a lot of trouble in file names.

For example /nix/store/ab1pfk338f6gzpglsirxhvji4g9w558i-hello-2.10 contains ab1pfk338f6gzpglsirxhvji4g9w558i which is the compression on 20 bytes of 0fqqilza6ifk0arlay18ab1pfk338f6gzrpcb56pnaw245h8gv9r. Basically folding excess bits with xor. Notice how some characters are shared, as the input is so small that some of them are passed as-is.

  ab1pfk338f6gzrpcb56pnaw245h8gv9r
^             0fqqilza6ifk0arlay18
  --------------------------------
= ab1pfk338f6gzpglsirxhvji4g9w558i

The full (uncompressed) digest comes from hashing the string output:out:sha256:5d4447675168bb44442f0d225ab8b50b7a67544f0ba2104dbf74926ff4df1d1e:/nix/store:hello-2.10. This string is a fingerprint of the important parts of that derivation. If any part changes, the hash will be different, and it will produce a different output path.

We can see four parts:

  1. output:out is the type of the fingerprint. Here we fingerprint something used for an output path. The output named out in this case. Nix uses various types, and each expects different things in the remainder of the string.
  2. sha256:5d4447675168bb44442f0d225ab8b50b7a67544f0ba2104dbf74926ff4df1d1e is the hash of the derivation building hello. As a hash it encompasses many things, and we will explore that further below.
  3. /nix/store is the store prefix.
  4. hello-2.10 is the name of the derivation.

Hashing the derivation is a tricky part. Nix store a lot of information about derivations. To read it, we can use nix show-derivation on our hello package.

{
  "/nix/store/4pmrswlhqyclwpv12l1h7mr9qkfhpd1c-hello-2.10.drv": {
    "outputs": {
      "out": { "path": "/nix/store/ab1pfk338f6gzpglsirxhvji4g9w558i-hello-2.10" }
    },
    "inputSrcs": [ "/nix/store/9krlzvny65gdc8s7kpb6lkx8cd02c25b-default-builder.sh" ],
    "inputDrvs": {
      "/nix/store/fkz4j4zj7xaf1z1g0i29987dvvc3xxbv-hello-2.10.tar.gz.drv": [ "out" ],
      "/nix/store/fsqdw7hjs2qdcy8qgcv5hnrajsr77xhc-bash-4.4-p23.drv": [ "out" ],
      "/nix/store/q0kiricfc0gkwm1vy3j0svcq5jib4v1g-stdenv-linux.drv": [ "out" ]
    },
    "platform": "x86_64-linux",
    "builder": "/nix/store/6737cq9nvp4k5r70qcgf61004r0l2g3v-bash-4.4-p23/bin/bash",
    "args": [ "-e", "/nix/store/9krlzvny65gdc8s7kpb6lkx8cd02c25b-default-builder.sh" ],
    "env": {
      "name": "hello-2.10",
      "out": "/nix/store/ab1pfk338f6gzpglsirxhvji4g9w558i-hello-2.10",
      "src": "/nix/store/3x7dwzq014bblazs7kq20p9hyzz0qh8g-hello-2.10.tar.gz",
      "stdenv": "/nix/store/50780gywsyjad8nxrf79q6qx7y7mqgal-stdenv-linux",
      // [elided for brevity]
    }
  }
}

show-derivation pretty prints and reformats the content of the .drv file. The exact content of /nix/store/4pmrswlhqyclwpv12l1h7mr9qkfhpd1c-hello-2.10.drv is a nested structure starting with "Derive(" and that’s why we will call it the derive string. It is formatted as an ATerm from the Stratego language. Curious readers will find more about this format in the related nix pill.

$ cat /nix/store/4pmrswlhqyclwpv12l1h7mr9qkfhpd1c-hello-2.10.drv
Derive([("out","/nix/store/ab1pfk338f6gzpglsirxhvji4g9w558i-hello-2.10","","")],[("/nix/store/fkz4j4zj7xaf1z1g0i29987dvvc3xxbv-hello-2.10.tar.gz.drv",["out"]),("/nix/store/fsqdw7hjs2qdcy8qgcv5hnrajsr77xhc-bash-4.4-p23.drv",["out"]),("/nix/store/q0kiricfc0gkwm1vy3j0svcq5jib4v1g-stdenv-linux.drv",["out"])],["/nix/store/9krlzvny65gdc8s7kpb6lkx8cd02c25b-default-builder.sh"],"x86_64-linux","/nix/store/6737cq9nvp4k5r70qcgf61004r0l2g3v-bash-4.4-p23/bin/bash",["-e","/nix/store/9krlzvny65gdc8s7kpb6lkx8cd02c25b-default-builder.sh"],[("buildInputs",""),("builder","/nix/store/6737cq9nvp4k5r70qcgf61004r0l2g3v-bash-4.4-p23/bin/bash"),("configureFlags",""),("depsBuildBuild",""),("depsBuildBuildPropagated",""),("depsBuildTarget",""),("depsBuildTargetPropagated",""),("depsHostHost",""),("depsHostHostPropagated",""),("depsTargetTarget",""),("depsTargetTargetPropagated",""),("doCheck","1"),("doInstallCheck",""),("name","hello-2.10"),("nativeBuildInputs",""),("out","/nix/store/ab1pfk338f6gzpglsirxhvji4g9w558i-hello-2.10"),("outputs","out"),("patches",""),("pname","hello"),("propagatedBuildInputs",""),("propagatedNativeBuildInputs",""),("src","/nix/store/3x7dwzq014bblazs7kq20p9hyzz0qh8g-hello-2.10.tar.gz"),("stdenv","/nix/store/50780gywsyjad8nxrf79q6qx7y7mqgal-stdenv-linux"),("strictDeps",""),("system","x86_64-linux"),("version","2.10")])

However, hashing this derive string directly does not yield the expected hash found above. (Do you recall the sha256:5d4447675168bb44442f0d225ab8b50b7a67544f0ba2104dbf74926ff4df1d1e ?)

$ nix-hash --flat --type sha256 /nix/store/4pmrswlhqyclwpv12l1h7mr9qkfhpd1c-hello-2.10.drv
40289ac3cc7d8896122c9a93ce580fb657aa29af6cf0a2bc4a30b3c53172ccf6

To understand where this hash comes from, it helps to understand other types of store objects. Let’s make a small detour to simpler paths.

Text files

Raw text files whose content is know by Nix without running any builder are named by a comparatively simpler scheme. Their name is a digest over both the content and the name of the path.

$ nix-instantiate --eval --expr 'builtins.toFile "file-name" "some content"'
/nix/store/gn48qr23kimj8iyh50jvffjx7335k9fz-file-name
└── gn48qr23kimj8iyh50jvffjx7335k9fz
    └── 0cl4lvq60bp9il749fyngn48qr23kimj8xalivaxf55lnp41s7h9
        └── "text:sha256:290f493c44f5d63d06b374d0a5abd292fae38b92cab2fae5efefe1b0e9347f56:/nix/store:file-name"
            └── 290f493c44f5d63d06b374d0a5abd292fae38b92cab2fae5efefe1b0e9347f56
                └── "some content"

The text format is also used by .drv files. But .drv files can depend on other .drv files. All the dependencies appear between the text: and :sha256 part of the path description.

/nix/store/4pmrswlhqyclwpv12l1h7mr9qkfhpd1c-hello-2.10.drv
└── 4pmrswlhqyclwpv12l1h7mr9qkfhpd1c
    └── 1c3ws0r5wm3ydx1zijcf4pmrswlhqyclxvqxqlqmv0spmfgg6zd2
        └── "text:[... dependant .drv's  ...]:sha256:40289ac3cc7d8896122c9a93ce580fb657aa29af6cf0a2bc4a30b3c53172ccf6:/nix/store:hello-2.10.drv"
            └── 40289ac3cc7d8896122c9a93ce580fb657aa29af6cf0a2bc4a30b3c53172ccf6
                └── "Derive([("out","... [content of /nix/store/4pmrswlhqyclwpv12l1h7mr9qkfhpd1c-hello-2.10.drv] ..."

All the different store path description strings are listed in store-api.cc. We have already seen ‘text’ right now and ‘output’ before. The third type is ‘source’, for some well-behaved, content addressed paths.

Hashing modulo

Back to our initial pkgs.hello store path. We were stuck at understanding the hash used there.

/nix/store/ab1pfk338f6gzpglsirxhvji4g9w558i-hello-2.10
└── ab1pfk338f6gzpglsirxhvji4g9w558i
    └── 0fqqilza6ifk0arlay18ab1pfk338f6gzrpcb56pnaw245h8gv9r
        └── "output:out:sha256:5d4447675168bb44442f0d225ab8b50b7a67544f0ba2104dbf74926ff4df1d1e:/nix/store:hello-2.10"
            └── 5d4447675168bb44442f0d225ab8b50b7a67544f0ba2104dbf74926ff4df1d1e
                └── ???

Ideally, this would be the hash of the ‘derive’ string from the .drv. This is not the case because it would be impossible and undesirable. The impossibility comes from the fact that the output paths of a derivation are part of its ‘derive’ string. The loop needs to be broken somewhere. That is why the output paths are replaced with empty strings before hashing the ‘derive’ string used in output paths.

The other aspect comes from fixed-output paths. While the recipe to build them may vary (and hence their derive string) we would like to avoid propagating such changes to other derivations outputs. As fixed-output derivations can happen anywhere in the dependency tree, the process of replacing the hash of fixed-output derivations needs to be recursive. This is performed by hashDerivationModulo() whose name hints that the hashing is made modulo the equivalence of recipes for the same fixed-output paths.

It means that instead of the former nix show-derivation result, hashDerivationModulo ends up hashing a modified derive string.

{
  "/nix/store/4pmrswlhqyclwpv12l1h7mr9qkfhpd1c-hello-2.10.drv +mased +modulo": {
    "outputs": {
      "out": { "path": "" } // masked
    },
    "inputSrcs": [ "/nix/store/9krlzvny65gdc8s7kpb6lkx8cd02c25b-default-builder.sh" ],
    "inputDrvs": {
      "103f297b7051255f2b7c1cd9838ee978d6ba392fb6ae2a6112d5816279c4ed14": [ "out" ], 
      // hash modulo fixed-ouput derivations of /nix/store/fsqdw7hjs2qdcy8qgcv5hnrajsr77xhc-bash-4.4-p23.drv
      "26f653058a4d742a815b4d3a3c0721bca16200ffc48c22d62b3eb54164560856": [ "out" ],
      // fixed hash of fixed-ouptut derivation /nix/store/3x7dwzq014bblazs7kq20p9hyzz0qh8g-hello-2.10.tar.gz
      // hash of the string 'fixed:out:sha256:31e066137a962676e89f69d1b65382de95a7ef7d914b8cb956f41ea72e0f516b:/nix/store/3x7dwzq014bblazs7kq20p9hyzz0qh8g-hello-2.10.tar.gz'
      "a9365c39d2b7a2a8f2340da6e9814ca605f8dcefe4b49f5c44db7d9ed3bb031f": [ "out" ]
      // hash modulo fixed-output derivations of /nix/store/q0kiricfc0gkwm1vy3j0svcq5jib4v1g-stdenv-linux.drv
    },
    "platform": "x86_64-linux",
    "builder": "/nix/store/6737cq9nvp4k5r70qcgf61004r0l2g3v-bash-4.4-p23/bin/bash",
    "args": [ "-e", "/nix/store/9krlzvny65gdc8s7kpb6lkx8cd02c25b-default-builder.sh" ],
    "env": {
      "name": "hello-2.10",
      "out": "", // masked
      "src": "/nix/store/3x7dwzq014bblazs7kq20p9hyzz0qh8g-hello-2.10.tar.gz",
      "stdenv": "/nix/store/50780gywsyjad8nxrf79q6qx7y7mqgal-stdenv-linux",
      // [still elided for brevity]
    }
  }
}

Recap

As we have seen, hashing in Nix is based on several concepts.

Description strings
starting with a type, and separated with colons. Highly recognisable. They describe uniquely a ressource. In practice, we never encounter them, as they are always hashed with sha256.
Hash compression
The hash appearing in path names is a folded version of full digests. Nix compresses the hash to 32 base32 characters.
Maksing
Derive strings contain the output paths of the derivation. As these output paths are generated based on a digest of the derivation itself, we have to break the loop. Masking is the process of removing output paths from a derive string before computing it’s hash.
Hashing modulo [other derivations]
Digests of derivations form a tree. Any change to a dependency’s derive string will propagate to all the dependant .drv paths and output paths. But it makes little sense to propagate changes in the recipe (the derive string) of a fixed output path. By definition, they will produce the same output regardless of their recipe. Nix computes output paths hashes on a tree of digests where fixed-output derive strings are replaced by the fixed-output hash.

Practical issues

So much for technical considerations. What is this useful for? The way hashes are computed constrains how they can be computed and generated.

In an HNix discussion, I discovered that the Nix daemon has two API calls to build derivations.

opBuildPaths is the most obvious one. It takes a list of pre-uploaded .drv files and triggers the build. Because a .drv depends on other .drv files, the full closure needs to be uploaded to the store upfront. In our example, that closure represents 280 .drv files to upload before starting the build. And hello is a relatively small package. This can slow down build times in distributed remote building situation where the builder responsible for a package may not be the one that built its dependencies. The machine will have to download all the .drv files when all it really needs is the hello .drv file and the build inputs paths.

That is why opBuildDerivation was implemented. It takes all the information from a derivation and builds it. The input paths need to be uploaded beforehand, but nothing more. This nice feature come with a downside. As we have seen, the ouptut path of a derivation is computed with hashDerivationModulo, which requires the full closure of derivations to substitute the hashe of fixed-output ones. Without the closure, it is impossible for the builder to check the validity of an output path. That is why this API call is a privileged operation.

Allowing unprivileged builds without the .drv closure is not an easy feature. As Eelco Dolstra states in the commit introducing opBuildDerivation, it would require changing the hashing scheme. And finding the right balance is complicated. Using a hash “without modulo” means that changing how we build fixed-output derivations will propagate to all the package. Not hashing inputs makes it possible to obtain the same output path name for all the derivations that change only in their inputs. For example, updating gcc would not change our hello output path. You could get different things under the same name. Not an option.

That sentence from Eelco Dolstra feels a bit like Fermat’s last theorem. While it seems to imply that there exists other hashing schemes, nothing is said about these schemes. Years later (the commit dates from 2015), the solution comes from a different angle. The long discussed, argued (and ultimately postponed) feature of a content-addressed store could bring builds without the .drv closure. Much like the proof of Fermat’s last theorem, the implementation of the content-addressed store comes long after the problem is sketched but, were it used only to solve that specific problem, would also feels like bringing an elephant to kill the mouse.

Content-addressed paths

In the content-addressed store, output path names are not derived from their .drv, but from their content. Orthogonal changes to .drv files are not reflected in the name, and do not propagate. The name changes only if the content changes. The major downside is that output path names cannot be known before their content is made available. That’s why we need two names. On for the output path we want to build, and one for the actual content-addressed result.

In such a setup, there is no need anymore for hashDerivationModulo. I tend to see hashDerivationModulo as a hack, a workaround to limit useless rebuilds as much as possible without having to implement the content-addressed store in its full complexity. That hack served us well over the years, and content-addressed stores are not yet implemented.

Closing thoughts

There is already a lot in this article, but we did not cover everything. There are several ways to upload a content-addressed path to the store, and content-addressed paths can also depend on other content-addressed paths. There are other funny corner cases here and there. But overall, this sketches the idea behind Nix store paths generation, and gives an idea of how derivations and store paths interact.

I had to leave aside the detailed explanation of content-addressed stores, but this is perhaps not for long…

This blog is still lacking a proper way to leave comments, but I would be more than happy to receive remarks, comments, advices and praises by email, or by any other channel if you are willing to wait more.

Some more stuff (a.k.a. Annexes)

Things that did not fit elsewhere.

A/ Python based hash compression.

""" XORing directly in base32, thanks to python """

h = "0fqqilza6ifk0arlay18ab1pfk338f6gzrpcb56pnaw245h8gv9r"
key = "0123456789abcdfghijklmnpqrsvwxyz" # no e,o,u,t
# len(key) == 32

def xor(a, b):
    return key[key.index(a) ^ key.index(b)]
# xor('0', 'a') == 'a'

h1, h2 = h[-32:], "{:0>32}".format(h[:-32])
res = "".join(xor(h1[i],h2[i]) for i in range(32))
print("  {}\n^ {}\n  ---------------------------------\n= {}".format(h1,h2,res))
# prints:
"""
  ab1pfk338f6gzrpcb56pnaw245h8gv9r
^ 0000000000000fqqilza6ifk0arlay18
  ---------------------------------
= ab1pfk338f6gzpglsirxhvji4g9w558i
"""

B/ Nix source code patch to trace digests being computed.

diff --git a/src/libutil/hash.cc b/src/libutil/hash.cc
index 4a94f0dfd..b06a08c79 100644
--- a/src/libutil/hash.cc
+++ b/src/libutil/hash.cc
@@ -316,6 +316,15 @@ Hash hashString(HashType ht, std::string_view s)
     start(ht, ctx);
     update(ht, ctx, (const unsigned char *) s.data(), s.length());
     finish(ht, ctx, hash.hash);
+    if (s.length() > 500 && s.data()[0] != 'D') {
+        warn("Hashing %d characters with '%s'", s.length(), ht);
+        warn("base32: %s", hash.to_string(Base32, true));
+    } else {
+        warn("Hashing '%s' with '%s'", s, ht);
+        warn("base16: %s", hash.to_string(Base16, true));
+        warn("base32: %s", hash.to_string(Base32, true));
+        warn("base64: %s", hash.to_string(Base64, true));
+    }
     return hash;
 }
 
@@ -380,6 +389,7 @@ Hash compressHash(const Hash & hash, unsigned int newSize)
     h.hashSize = newSize;
     for (unsigned int i = 0; i < hash.hashSize; ++i)
         h.hash[i % newSize] ^= hash.hash[i];
+    warn("Compressed '%s' to size %d: '%s'", hash.to_string(Base32, false), newSize, h.to_string(Base32, false));
     return h;
 }

C/ The full log of hashes generated for out pkgs.hello example with the above logging patch is available on gist.

by layus at September 01, 2020 12:00 AM

August 28, 2020

nixbuild.net

nixbuild.net is Generally Available

Today, nixbuild.net is exiting private beta and made generally available! Anyone can now sign up for a nixbuild.net account and immediately start building using the free CPU hours included with every account.

After the free CPU hours have been consumed, the pricing is simple: 0.12 EUR (excl. VAT) per CPU hour consumed, billed monthly.

As part of this GA announcement, a number of marketing and documentation improvements have been published:

We’re really happy for nixbuild.net to enter this new phase — making simple, performant and scalable remote builds available to every Nix user! We’re excited to see how the service is used, and we have lots of plans for the future of nixbuild.net.

by nixbuild.net (support@nixbuild.net) at August 28, 2020 12:00 AM

August 20, 2020

Tweag I/O

How Nix grew a marketing team

Recently I witnessed the moment when a potential Nix user reached eureka. The moment where everything regarding Nix made sense. My friend, now a Nix user, screamed from joy: “We need to Nix–ify everything!”

Moments like these reinforce my belief that Nix is a solution from — and for — the future. A solution that could reach many more people, only if learning about Nix didn’t demand investing as much time and effort as it does now.

I think that Nix has the perfect foundation for becoming a success but that it still needs better marketing. Many others agree with me, and that’s why we formed the Nix marketing team.

I would like to convince you that indeed, marketing is the way to go and that it is worth it. Therefore, in this post I will share my thoughts on what kind of success we aim for, and which marketing efforts we are currently pursuing. The marketing team is already giving its first results, and with your input, we can go further.

What does success look like?

At the time of writing this post, I have been using Nix for 10 years. I organized one and attended most of the Nix conferences since then, and talked to many people in the community. All of this does not give me the authority to say what success for Nix looks like, but it does give me a great insight into what we — the Nix community — can agree on.

Success for Nix would be the next time you encounter a project on GitHub, it would already contain a default.nix for you to start developing. Success for Nix would be the next time you try to run a server on the cloud, NixOS would be offered to you. Or even more ambitious, would be other communities recognising Nix as a de facto standard that improves the industry as a whole.

To some, this success statement may seem very obvious. However, it is important to say it out loud and often, so we can keep focus, and keep working on the parts of Nix that will contribute the most to this success.

The importance of marketing

Before we delve into what Nix still lacks, I would like to say that we — engineers and developers — should be aware of our bias against marketing. This bias becomes clear when we think about what we think are the defining aspects for a project’s success. We tend to believe that code is everything, and that good code leads to good results. But what if I tell you that good marketing constitutes more than 50% of the success of a project? Would you be upset? We have to overcome this bias, since it prevents us from seeing the big picture.

Putting aside those Sunday afternoons when I code for the pure joy of stretching my mind, most of the time I simply want to solve a problem. The joy when seeing others realizing that their problem is not a problem anymore, is one of the best feelings I experienced as a developer. This is what drives me. Not the act of coding itself, but the act of solving the problem. Coding is then only part of the solution. Others need to know about the existence of your code, understand how it can solve their problem and furthermore they need to know how to use it.

That is why marketing, and, more generally, non-technical work, is at least as important as technical work. Documentation, writing blog posts, creating content for the website, release announcements, conference talks, conference booths, forums, chat channels, email lists, demo videos, use cases, swag, search engine optimisation, social media presence, engaging with the community… These are all crucial parts of any successful project.

Nix needs better marketing, from a better website to better documentation, along with all the ingredients mentioned above. If we want Nix to grow as a project we need to improve our marketing game, since this is the area of work that is historically receiving the least amount of attention. And we are starting to work on it. In the middle of March 2020, a bunch of us got together and announced the creation of the Nix marketing team. Since then we meet roughly every two weeks to discuss and work on non-technical challenges that the Nix project is facing.

But before the Nix marketing team could start doing any actual work we had to answer an important question:

What is Nix?

I want to argue that the Nix community is still missing an answer to an apparently very simple question: What is Nix?.

The reason why what is Nix? is a harder question than it may appear at first, is that any complete answer has to tell us what and who Nix is for. Knowing the audience and primary use cases is a precondition to improving the website, documentation, or even Nix itself.

This is what the Nix marketing team discussed first. We identified the following audiences and primary use cases:

  1. Development environments (audience: developers)
  2. Deploying to the cloud (audience: system administrators)

It doesn’t mean other use cases are not important — they are. We are just using the primary use cases as a gateway drug into the rest of the Nix’s ecosystem. In this way, new users will not be overwhelmed with all the existing options and will have a clear idea where to start.

Some reasons for selecting the two use cases are:

  • Both use cases are relatively polished solutions. Clearly, there is still much to be improved, but currently these are the two use cases with the best user experience in the Nix ecosystem.
  • One use case is a natural continuation of another. First, you develop and then you can use the same tools to package and deploy.
  • Market size for both use cases is huge, which means there is a big potential.

A differentiating factor — why somebody would choose Nix over others — is Nix’s ability to provide reproducible results. The promise of reproducibility is the aspect that already attracts the majority of Nix’s user base. From this, we came up with a slogan for Nix:

Reproducible builds and deploys

With the basic question answered we started working.

What has been done so far? How can I help?

So far, the Marketing team focused on improving the website:

  1. Moved the website to Netlify. The important part is not switching to Netlify, but separating the website from the Nix infrastructure. This removes the fear of a website update bringing down parts of Nix infrastructure.
  2. Simplified navigation. If you remember, the navigation was different for each project that was listed on the website. We removed the project differentiation and unified navigation. This will show Nix ecosystem as a unified story and not a collection of projects. One story is easier to follow than five.
  3. Created a new learn page. Discoverability of documentation was a huge problem. Links to popular topics in manuals are now more visible. Some work on entry level tutorials has also started. Good and beginner friendly learning resources are what is going to create the next generation of Nix users.
  4. Created new team pages. We collected information about different official and less official teams working on Nix. The work here is not done, but it shows that many teams don’t have clear responsibilities. It shows how decisions are made and invites new Nix users to become more involved with the project.
  5. Improved landing page. Instead of telling the user what Nix is, they will experience it from the start. The landing page is filled with examples that will convince visitors to give Nix a try.

The work of the marketing team has just started, and there is still a lot to be done. We are working hard on redesigning the website and improving the messaging. The roadmap will tell you more about what to expect next.

If you wish to help come and say hi to #nixos-marketing on irc.freenode.org.

Conclusion

Marketing, and non-technical work, is all too often an afterthought for developers. I really wish it weren’t the case. Having clearly defined problems, audience and strategy should be as important to us as having clean and tested code. This is important for Nix. This is important for any project that aims to succeed.

August 20, 2020 12:00 AM

August 13, 2020

nixbuild.net

Build Reuse in nixbuild.net

Performance and cost-effectiveness are core values for nixbuild.net. How do you make a Nix build as performant and cheap as possible? The answer is — by not running it at all!

This post goes into some detail about the different ways nixbuild.net is able to safely reuse build results. The post gets technical, but the main message is that nixbuild.net really tries to avoid building if it can, in order to save time and money for its users.

Binary Caches

The most obvious way of reusing build results is by utilising binary caches, and an earlier blog post described how this is supported by nixbuild.net. In short, if something has been built on cache.nixos.org, nixbuild.net can skip building it and just fetch it. It is also possible to configure other binary caches to use, and even treat the builds of specific nixbuild.net users in the same way as a trusted binary cache.

No Shared Uploads

As part of the Nix remote build protocol, inputs (dependencies) can be uploaded directly to nixbuild.net. Those inputs are not necessarily trustworty, because we don’t know how they were produced. Therefore, those inputs are only allowed to be used by the user who uploaded them. The exception is if the uploaded input had a signature from a binary cache key, then we allow it to be used by all accounts that trust that specific key. Also, if explicit trust has been setup between two accounts, uploaded paths will be shared.

Derivation Sharing

Another method of reuse, unique to nixbuild.net, is the sharing of build results between users that don’t necessarily trust each other. It works like this:

  1. When we receive a build request, we get a derivation from the user’s Nix client. In essence, this derivation describes what inputs (dependencies) the build needs, and what commands must be run to produce the build output.

  2. The inputs are described in the derivation simply as a list of store paths (/nix/store/abc, /nix/store/xyz). The way the Nix remote build protocol works, those store paths have already been provided to us, either because we already had trusted variants of them in our storage, or because we’ve downloaded them from binary caches, or because the client uploaded them to us.

    In order for us to be able to run the build, we need to map the input store paths to the actual file contents of the inputs. This mapping can actually vary even though store paths are the same. This is because a Nix store path does not depend on the contents of the path, but rather on the dependencies of the path. So we can very well have multiple versions of the same store path in our storage, because multiple users might have uploaded differing builds of the same paths.

    Anyhow, we will end up with a mapping that depends entirely on what paths the user is allowed to use. So, two users may build the exact same derivation but get different store-path-to-content mappings.

  3. At this stage, we store a representation of both the derivation itself, and the mapping described in previous step. Together, these two pieces represent a unique derivation in nixbuild.net’s database.

  4. Now, we can build the derivation. The build runs inside an isolated, virtualized sandbox that has no network access and nothing other than its inputs inside its filesystem.

    The sandbox is of course vital for keeping your builds secure, but it has another application, too: If we already have built a specific derivation (with a specific set of input content), this build result can be reused for any user that comes along and requests a build of the exact same derivation with the exact same set of input content.

We do not yet have any numbers on how big impact this type of build result sharing has in practice. The effectiveness will depend on how reproducible the builds are, and of course also on how many users that are likely to build the same derivations.

For an organization with a large set of custom packages that want to share binary builds with contributors and users, it could turn out useful. The benefit for users is that they don’t actually have to blindly trust a binary cache but instead can be sure that they get binaries that correspond to the nix derivations they have evaluated.

by nixbuild.net (support@nixbuild.net) at August 13, 2020 12:00 AM

August 12, 2020

Tweag I/O

Developing Python with Poetry & Poetry2nix: Reproducible flexible Python environments

Most Python projects are in fact polyglot. Indeed, many popular libraries on PyPi are Python wrappers around C code. This applies particularly to popular scientific computing packages, such as scipy and numpy. Normally, this is the terrain where Nix shines, but its support for Python projects has often been labor-intensive, requiring lots of manual fiddling and fine-tuning. One of the reasons for this is that most Python package management tools do not give enough static information about the project, not offering the determinism needed by Nix.

Thanks to Poetry, this is a problem of the past — its rich lock file offers more than enough information to get Nix running, with minimal manual intervention. In this post, I will show how to use Poetry, together with Poetry2nix, to easily manage Python projects with Nix. I will show how to package a simple Python application both using the existing support for Python in Nixpkgs, and then using Poetry2nix. This will both show why Poetry2nix is more convenient, and serve as a short tutorial covering its features.

Our application

We are going to package a simple application, a Flask server with two endpoints: one returning a static string “Hello World” and another returning a resized image. This application was chosen because:

  1. It can fit into a single file for the purposes of this post.
  2. Image resizing using Pillow requires the use of native libraries, which is something of a strength of Nix.

The code for it is in the imgapp/__init__.py file:

from flask import send_file
from flask import Flask
from io import BytesIO
from PIL import Image
import requests


app = Flask(__name__)


IMAGE_URL = "https://farm1.staticflickr.com/422/32287743652_9f69a6e9d9_b.jpg"
IMAGE_SIZE = (300, 300)


@app.route('/')
def hello():
    return "Hello World!"


@app.route('/image')
def image():
    r = requests.get(IMAGE_URL)
    if not r.status_code == 200:
        raise ValueError(f"Response code was '{r.status_code}'")

    img_io = BytesIO()

    img = Image.open(BytesIO(r.content))
    img.thumbnail(IMAGE_SIZE)
    img.save(img_io, 'JPEG', quality=70)

    img_io.seek(0)

    return send_file(img_io, mimetype='image/jpeg')


def main():
    app.run()


if __name__ == '__main__':
    main()

The status quo for packaging Python with Nix

There are two standard techniques for integrating Python projects with Nix.

Nix only

The first technique uses only Nix for package management, and is described in the Python section of the Nix manual. While it works and may look very appealing on the surface, it uses Nix for all package management needs, which comes with some drawbacks:

  1. We are essentially tied to whatever package version Nixpkgs provides for any given dependency. This can be worked around with overrides, but those can cause version incompatibilities. This happens often in complex Python projects, such as data science ones, which tend to be very sensitive to version changes.
  2. We are tied to using packages already in Nixpkgs. While Nixpkgs has many Python packages already packaged up (around 3000 right now) there are many packages missing — PyPi, the Python Package Index has more than 200000 packages. This can of course be worked around with overlays and manual packaging, but this quickly becomes a daunting task.
  3. In a team setting, every team member wanting to add packages needs to buy in to Nix and at least have some experience using and understanding Nix.

All these factors lead us to a conclusion: we need to embrace Python tooling so we can efficiently work with the entire Python ecosystem.

Pip and Pypi2Nix

The second standard method tries to overcome the faults above by using a hybrid approach of Python tooling together with Nix code generation. Instead of writing dependencies manually in Nix, they are extracted from the requirements.txt file that users of Pip and Virtualenv are very used to. That is, from a requirements.txt file containing the necessary dependencies:

requests
pillow
flask

we can use pypi2nix to package our application in a more automatic fashion than before:

nix-shell -p pypi2nix --run "pypi2nix -r requirements.txt"

However, Pip is not a dependency manager and therefore the requirements.txt file is not explicit enough — it lacks both exact versions for libraries, and system dependencies. Therefore, the command above will not produce a working Nix expression. In order to make pypi2nix work correctly, one has to manually find all dependencies incurred by the use of Pillow:

nix-shell -p pypi2nix --run "pypi2nix -V 3.8 -E pkgconfig -E freetype -E libjpeg -E openjpeg -E zlib -E libtiff -E libwebp -E tcl -E lcms2 -E xorg.libxcb -r requirements.txt"

This will generate a large Nix expression, that will indeed work as expected. Further use of Pypi2nix is left to the reader, but we can already draw some conclusions about this approach:

  1. Code generation results in huge Nix expressions that can be hard to debug and understand. These expressions will typically be checked into a project repository, and can get out of sync with actual dependencies.
  2. It’s very high friction, especially around native dependencies.

Having many large Python projects, I wasn’t satisfied with the status quo around Python package management. So I looked into what could be done to make the situation better, and which tools could be more appropriate for our use-case. A potential candidate was Pipenv, however its dependency solver and lock file format were difficult to work with. In particular, Pipenv’s detection of “local” vs “non-local” dependencies did not work properly inside the Nix shell and gave us the wrong dependency graph. Eventually, I found Poetry and it looked very promising.

Poetry and Poetry2nix

The Poetry package manager is a relatively recent addition to the Python ecosystem but it is gaining popularity very quickly. Poetry features a nice CLI with good UX and deterministic builds through lock files.

Poetry uses pip under the hood and, for this reason, inherited some of its shortcomings and lock file design. I managed to land a few patches in Poetry before the 1.0 release to improve the lock file format, and now it is fit for use in Nix builds. The result was Poetry2nix, whose key design goals were:

  1. Dead simple API.
  2. Work with the entire Python ecosystem using regular Python tooling.
  3. Python developers should not have to be Nix experts, and vice versa.
  4. Being an expert should allow you to “drop down” into the lower levels of the build and customise it.

Poetry2nix is not a code generation tool — it is implemented in pure Nix. This fixes many of problems outlined in previous paragraphs, since there is a single point of truth for dependencies and their versions.

But what about our native dependencies from before? How does Poetry2nix know about those? Indeed, Poetry2nix comes with an extensive set of overrides built-in for a lot of common packages, including Pillow. Users are encouraged to contribute overrides upstream for popular packages, so everyone can have a better user experience.

Now, let’s see how Poetry2nix works in practice.

Developing with Poetry

Let’s start with only our application file above (imgapp/__init__.py) and a shell.nix:

{ pkgs ? import <nixpkgs> {} }:

pkgs.mkShell {

  buildInputs = [
    pkgs.python3
    pkgs.poetry
  ];

}

Poetry comes with some nice helpers to create a project, so we run:

$ poetry init

And then we’ll add our dependencies:

$ poetry add requests pillow flask

We now have two files in the folder:

  • The first one is pyproject.toml which not only specifies our dependencies but also replaces setup.py.
  • The second is poetry.lock which contains our entire pinned Python dependency graph.

For Nix to know which scripts to install in the bin/ output directory, we also need to add a scripts section to pyproject.toml:

[tool.poetry]
name = "imgapp"
version = "0.1.0"
description = ""
authors = ["adisbladis <adisbladis@gmail.com>"]

[tool.poetry.dependencies]
python = "^3.7"
requests = "^2.23.0"
pillow = "^7.1.2"
flask = "^1.1.2"

[tool.poetry.dev-dependencies]

[tool.poetry.scripts]
imgapp = 'imgapp:main'

[build-system]
requires = ["poetry>=0.12"]
build-backend = "poetry.masonry.api"

Packaging with Poetry2nix

Since Poetry2nix is not a code generation tool but implemented entirely in Nix, this step is trivial. Create a default.nix containing:

{ pkgs ? import <nixpkgs> {} }:
pkgs.poetry2nix.mkPoetryApplication {
  projectDir = ./.;
}

We can now invoke nix-build to build our package defined in default.nix. Poetry2nix will automatically infer package names, dependencies, meta attributes and more from the Poetry metadata.

Manipulating overrides

Many overrides for system dependencies are already upstream, but what if some are lacking? These overrides can be manipulated and extended manually:

poetry2nix.mkPoetryApplication {
    projectDir = ./.;
    overrides = poetry2nix.overrides.withDefaults (self: super: {
      foo = foo.overridePythonAttrs(oldAttrs: {});
    });
}

Conclusion

By embracing both modern Python package management tooling and the Nix language, we can achieve best-in-class user experience for Python developers and Nix developers alike.

There are ongoing efforts to make Poetry2nix and other Nix Python tooling work better with data science packages like numpy and scipy. I believe that Nix may soon rival Conda on Linux and MacOS for data science.

Python + Nix has a bright future ahead of it!

August 12, 2020 12:00 AM

August 11, 2020

Sander van der Burg

Experimenting with Nix and the service management properties of Docker

In the previous blog post, I have analyzed Nix and Docker as deployment solutions and described in what ways these solutions are similar and different.

To summarize my findings:

  • Nix is a source-based package manager responsible for obtaining, installing, configuring and upgrading packages in a reliable and reproducible manner and facilitating the construction of packages from source code and their dependencies.
  • Docker's purpose is to fully manage the life-cycle of applications (services and ordinary processes) in a reliable and reproducible manner, including their deployments.

As explained in my previous blog post, two prominent goals both solutions have in common is to facilitate reliable and reproducible deployment. They both use different kinds of techniques to accomplish these goals.

Although Nix and Docker can be used for a variety of comparable use cases (such as constructing images, deploying test environments, and constructing packages from source code), one prominent feature that the Nix package manager does not provide is process (or service) management.

In a Nix-based workflow you need to augment Nix with another solution that can facilitate process management.

In this blog post, I will investigate how Docker could fulfill this role -- it is pretty much the opposite goal of the combined use cases scenarios I have shown in the previous blog post, in which Nix can overtake the role of a conventional package manager in supplying packages in the construction process of an image and even the complete construction process of images.

Existing Nix integrations with process management


Although Nix does not do any process management, there are sister projects that can, such as:

  • NixOS builds entire machine configurations from a single declarative deployment specification and uses the Nix package manager to deploy and isolate all static artifacts of a system. It will also automatically generate and deploy systemd units for services defined in a NixOS configuration.
  • nix-darwin can be used to specify a collection of services in a deployment specification and uses the Nix package manager to deploy all services and their corresponding launchd configuration files.

Although both projects do a great job (e.g. they both provide a big collection of deployable services) what I consider a disadvantage is that they are platform specific -- both solutions only work on a single operating system (Linux and macOS) and a single process management solution (systemd and launchd).

If you are using Nix in a different environment, such as a different operating system, a conventional (non-NixOS) Linux distribution, or a different process manager, then there is no off-the-shelf solution that will help you managing services for packages provided by Nix.

Docker functionality


Docker could be considered a multi-functional solution for application management. I can categorize its functionality as follows:

  • Process management. The life-cycle of a container is bound to the life-cycle of a root process that needs to be started or stopped.
  • Dependency management. To ensure that applications have all the dependencies that they need and that no dependency is missing, Docker uses images containing a complete root filesystem with all required files to run an application.
  • Resource isolation is heavily used for a variety of different reasons:
    • Foremost, to ensure that the root filesystem of the container does not conflict with the host system's root filesystem.
    • It is also used to prevent conflicts with other kinds of resources. For example, the isolated network interfaces allow services to bind to the same TCP ports that may also be in use by the host system or other containers.
    • It offers some degree of protection. For example, a malicious process will not be able to see or control a process belonging to the host system or a different container.
  • Resource restriction can be used to limit the amount of system resources that a process can consume, such as the amount of RAM.

    Resource restriction can be useful for a variety of reasons, for example, to prevent a service from eating up all the system's resources affecting the stability of the system as a whole.
  • Integrations with the host system (e.g. volumes) and other services.

As described in the previous blog post, Docker uses a number of key concepts to implement the functionality shown above, such as layers, namespaces and cgroups.

Developing a Nix-based process management solution


For quite some time, I have been investigating the process management domain and worked on a prototype solution to provide a more generalized infrastructure that complements Nix with process management -- I came up with an experimental Nix-based process manager-agnostic framework that has the following objectives:

  • It uses Nix to deploy all required packages and other static artifacts (such as configuration files) that a service needs.
  • It integrates with a variety of process managers on a variety of operating systems. So far, it can work with: sysvinit scripts, BSD rc scripts, supervisord, systemd, cygrunsrv and launchd.

    In addition to process managers, it can also automatically convert a processes model to deployment specifications that Disnix can consume.
  • It uses declarative specifications to define functions that construct managed processes and process instances.

    Processes can be declared in a process-manager specific and process-manager agnostic way. The latter makes it possible to target all six supported process managers with the same declarative specification, albeit with a limited set of features.
  • It allows you to run multiple instances of processes, by introducing a convention to cope with potential resource conflicts between process instances -- instance properties and potential conflicts can be configured with function parameters and can be changed in such a way that they do not conflict.
  • It can facilitate unprivileged user deployments by using Nix's ability to perform unprivileged package deployments and introducing a convention that allows you to disable user switching.

To summarize how the solution works from a user point of view, we can write a process manager-agnostic constructor function as follows:


{createManagedProcess, tmpDir}:
{port, instanceSuffix ? "", instanceName ? "webapp${instanceSuffix}"}:

let
webapp = import ../../webapp;
in
createManagedProcess {
name = instanceName;
description = "Simple web application";
inherit instanceName;

process = "${webapp}/bin/webapp";
daemonArgs = [ "-D" ];

environment = {
PORT = port;
PID_FILE = "${tmpDir}/${instanceName}.pid";
};
user = instanceName;
credentials = {
groups = {
"${instanceName}" = {};
};
users = {
"${instanceName}" = {
group = instanceName;
description = "Webapp";
};
};
};

overrides = {
sysvinit = {
runlevels = [ 3 4 5 ];
};
};
}

The Nix expression above is a nested function that defines in a process manager-agnostic way a configuration for a web application process containing an embedded web server serving a static HTML page.

  • The outer function header (first line) refers to parameters that are common to all process instances: createManagedProcess is a function that can construct process manager configurations and tmpDir refers to the directory in which temp files are stored (which is /tmp in conventional Linux installations).
  • The inner function header (second line) refers to instance parameters -- when it is desired to construct multiple instances of this process, we must make sure that we have configured these parameters in such as a way that they do not conflict with other processes.

    For example, when we assign a unique TCP port and a unique instance name (a property used by the daemon tool to create unique PID files) we can safely have multiple instances of this service co-existing on the same system.
  • In the body, we invoke the createManagedProcess function to generate configurations files for a process manager.
  • The process parameter specifies the executable that we need to run to start the process.
  • The daemonArgs parameter specifies command-line instructions passed to the the process executable, when the process should daemonize itself (the -D parameter instructs the webapp process to daemonize).
  • The environment parameter specifies all environment variables. Environment variables are used as a generic configuration facility for the service.
  • The user parameter specifies the name the process should run as (each process instance has its own user and group with the same name as the instance).
  • The credentials parameter is used to automatically create the group and user that the process needs.
  • The overrides parameter makes it possible to override the parameters generated by the createManagedProcess function with process manager-specific overrides, to configure features that are not universally supported.

    In the example above, we use an override to configure the runlevels in which the service should run (runlevels 3-5 are typically used to boot a system that is network capable). Runlevels are a sysvinit-specific concept.

In addition to defining constructor functions allowing us to construct zero or more process instances, we also need to construct process instances. These can be defined in a processes model:


{ pkgs ? import <nixpkgs> { inherit system; }
, system ? builtins.currentSystem
, stateDir ? "/var"
, runtimeDir ? "${stateDir}/run"
, logDir ? "${stateDir}/log"
, cacheDir ? "${stateDir}/cache"
, tmpDir ? (if stateDir == "/var" then "/tmp" else "${stateDir}/tmp")
, forceDisableUserChange ? false
, processManager
}:

let
constructors = import ./constructors.nix {
inherit pkgs stateDir runtimeDir logDir tmpDir;
inherit forceDisableUserChange processManager;
};
in
rec {
webapp = rec {
port = 5000;
dnsName = "webapp.local";

pkg = constructors.webapp {
inherit port;
};
};

nginxReverseProxy = rec {
port = 8080;

pkg = constructors.nginxReverseProxyHostBased {
webapps = [ webapp ];
inherit port;
} {};
};
}

The above Nix expressions defines two process instances and uses the following conventions:

  • The first line is a function header in which the function parameters correspond to ajustable properties that apply to all process instances:
    • stateDir allows you to globally override the base directory in which all state is stored (the default value is: /var).
    • We can also change the locations of each individual state directories: tmpDir, cacheDir, logDir, runtimeDir etc.) if desired.
    • forceDisableUserChange can be enabled to prevent the process manager to change user permissions and create users and groups. This is useful to facilitate unprivileged user deployments in which the user typically has no rights to change user permissions.
    • The processManager parameter allows you to pick a process manager. All process configurations will be automatically generated for the selected process manager.

      For example, if we would pick: systemd then all configurations get translated to systemd units. supervisord causes all configurations to be translated to supervisord configuration files.
  • To get access to constructor functions, we import a constructors expression that composes all constructor functions by calling them with their common parameters (not shown in this blog post).

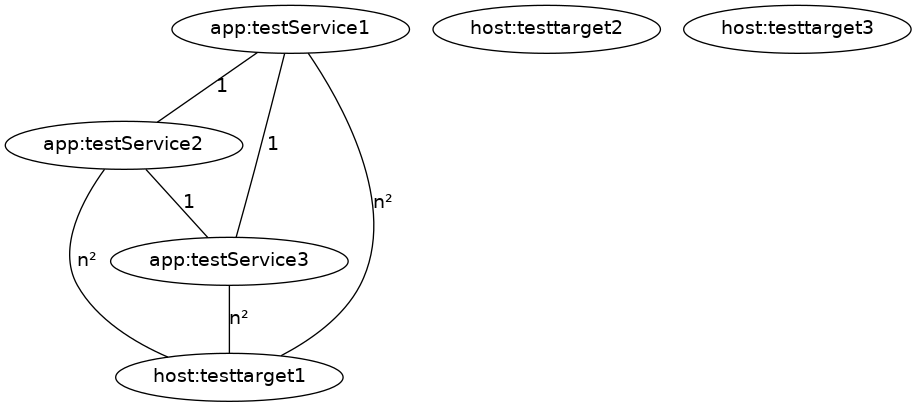
    The constructors expression also contains a reference to the Nix expression that deploys the webapp service, shown in our previous example.
  • The processes model defines two processes: a webapp instance that listens to TCP port 5000 and Nginx that acts as a reverse proxy forwarding requests to webapp process instances based on the virtual host name.
  • webapp is declared a dependency of the nginxReverseProxy service (by passing webapp as a parameter to the constructor function of Nginx). This causes webapp to be activated before the nginxReverseProxy.

To deploy all process instances with a process manager, we can invoke a variety of tools that are bundled with the experimental Nix process management framework.

The process model can be deployed as sysvinit scripts for an unprivileged user, with the following command:


$ nixproc-sysvinit-switch --state-dir /home/sander/var \
--force-disable-user-change processes.nix

The above command automatically generates sysvinit scripts, changes the base directory of all state folders to a directory in the user's home directory: /home/sander/var and disables user changing (and creation) so that an unprivileged user can run it.

The following command uses systemd as a process manager with the default parameters, for production deployments:


$ nixproc-systemd-switch processes.nix

The above command automatically generates systemd unit files and invokes systemd to deploy the processes.

In addition to the examples shown above, the framework contains many more tools, such as: nixproc-supervisord-switch, nixproc-launchd-switch, nixproc-bsdrc-switch, nixproc-cygrunsrv-switch, and nixproc-disnix-switch that all work with the same processes model.

Integrating Docker into the process management framework


Both Docker and the Nix-based process management framework are multi-functional solutions. After comparing the functionality of Docker and the process management framework, I realized that it is possible to integrate Docker into this framework as well, if I would use it in an unconventional way, by disabling or substituting some if its conflicting features.

Using a shared Nix store


As explained in the beginning of this blog post, Docker's primary means to provide dependencies is by using images that are self-contained root file systems containing all necessary files (e.g. packages, configuration files) to allow an application to work.

In the previous blog post, I have also demonstrated that instead of using traditional Dockerfiles to construct images, we can also use the Nix package manager as a replacement. A Docker image built by Nix is typically smaller than a conventional Docker image built from a base Linux distribution, because it only contains the runtime dependencies that an application actually needs.

A major disadvantage of using Nix constructed Docker images is that they only consist of one layer -- as a result, there is no reuse between container instances running different services that use common libraries. To alleviate this problem, Nix can also build layered images, in which common dependencies are isolated in separate layers as much as possible.

There is even a more optimal reuse strategy possible -- when running Docker on a machine that also has Nix installed, we do not need to put anything that is in the Nix store in a disk image. Instead, we can share the host system's Nix store between Docker containers.

This may sound scary, but as I have explained in the previous blog post, paths in the Nix store are prefixed with SHA256 hash codes. When two Nix store paths with identical hash codes are built on two different machines, their build results should be (nearly) bit-identical. As a result, it is safe to share the same Nix store path between multiple machines and containers.

A hacky solution to build a container image, without actually putting any of the Nix built packages in the container, can be done with the following expression:


with import <nixpkgs> {};

let
cmd = [ "${nginx}/bin/nginx" "-g" "daemon off;" "-c" ./nginx.conf ];
in
dockerTools.buildImage {
name = "nginxexp";
tag = "test";

runAsRoot = ''
${dockerTools.shadowSetup}
groupadd -r nogroup
useradd -r nobody -g nogroup -d /dev/null
mkdir -p /var/log/nginx /var/cache/nginx /var/www
cp ${./index.html} /var/www/index.html
'';

config = {
Cmd = map (arg: builtins.unsafeDiscardStringContext arg) cmd;
Expose = {
"80/tcp" = {};
};
};
}

The above expression is quite similar to the Nix-based Docker image example shown in the previous blog post, that deploys Nginx serving a static HTML page.

The only difference is how I configure the start command (the Cmd parameter). In the Nix expression language, strings have context -- if a string with context is passed to a build function (any string that contains a value that evaluates to a Nix store path), then the corresponding Nix store paths automatically become a dependency of the package that the build function builds.

By using the unsafe builtins.unsafeDiscardStringContext function I can discard the context of strings. As a result, the Nix packages that the image requires are still built. However, because their context is discarded they are no longer considered dependencies of the Docker image. As a consequence, they will not be integrated into the image that the dockerTools.buildImage creates.

(As a sidenote: there are still two Nix store paths that end-up in the image, namely bash and glibc that is a runtime dependency of bash. This is caused by the fact that the internals of the dockerTools.buildImage function make a reference to bash without discarding its context. In theory, it is also possible to eliminate this dependency as well).

To run the container and make sure that the required Nix store paths are available, I can mount the host system's Nix store as a shared volume:


$ docker run -p 8080:80 -v /nix/store:/nix/store -it nginxexp:latest

By mounting the host system's Nix store (with the -v parameter), Nginx should still behave as expected -- it is not provided by the image, but referenced from the shared Nix store.

(As a sidenote: mounting the host system's Nix store for sharing is not a new idea. It has already been intensively used by the NixOS test driver for many years to rapidly create QEMU virtual machines for system integration tests).

Using the host system's network


As explained in the previous blog post, every Docker container by default runs in its own private network namespace making it possible for services to bind to any port without conflicting with the services on the host system or services provided by any other container.

The Nix process management framework does not work with private networks, because it is not a generalizable concept (i.e. namespaces are a Linux-only feature). Aside from Docker, the only other process manager supported by the framework that can work with namespaces is systemd.

To prevent ports and other dynamic resources from conflicting with each other, the process management framework makes it possible to configure them through instance function parameters. If the instance parameters have unique values, they will not conflict with other process instances (based on the assumption that the packager has identified all possible conflicts that a process might have).

Because we already have a framework that prevents conflicts, we can also instruct Docker to use the host system's network with the --network host parameter:


$ docker run -v /nix/store:/nix/store --network host -it nginxexp:latest

The only thing the framework cannot provide you is protection -- mallicious services in a private network namespace cannot connect to ports used by other containers or the host system, but the framework cannot protect you from that.

Mapping a base directory for storing state


Services that run in containers are not always stateless -- they may rely on data that should be persistently stored, such as databases. The Docker recommendation to handle persistent state is not to store it in a container's writable layer, but on a shared volume on the host system.

Data stored outside the container makes it possible to reliably upgrade a container -- when it is desired to install a newer version of an application, the container can be discarded and recreated from a new image.

For the Nix process management framework, integration with a state directory outside the container is also useful. With an extra shared volume, we can mount the host system's state directory:


$ docker run -v /nix/store:/nix/store \
-v /var:/var --network host -it nginxexp:latest

Orchestrating containers


The last piece in the puzzle is to orchestrate the containers: we must create or discard them, and start or stop them, and perform all required steps in the right order.

Moreover, to prevent the Nix packages that a containers needs from being garbage collected, we need to make sure that they are a dependency of a package that is registered as in use.

I came up with my own convention to implement the container deployment process. When building the processes model for the docker process manager, the following files are generated that help me orchestrating the deployment process:


01-webapp-docker-priority
02-nginx-docker-priority
nginx-docker-cmd
nginx-docker-createparams
nginx-docker-settings
webapp-docker-cmd
webapp-docker-createparams
webapp-docker-settings

In the above list, we have the following kinds of files:

  • The files that have a -docker-settings suffix contain general properties of the container, such as the image that needs to be used a template.
  • The files that have a -docker-createparams suffix contain the command line parameters that are propagated to docker create to create the container. If a container with the same name already exists, the container creation is skipped and the existing instance is used instead.
  • To prevent the Nix packages that a Docker container needs from being garbage collected the generator creates a file with a -docker-cmd suffix containing the Cmd instruction including the full Nix store paths of the packages that a container needs.

    Because the strings' contexts are not discarded in the generation process, the packages become a dependency of the configuration file. As long as this configuration file is deployed, the packages will not get garbage collected.
  • To ensure that the containers are activated in the right order we have two files that are prefixed with two numeric digits that have a -container-priority suffix. The numeric digits determine in which order the containers should be activated -- in the above example the webapp process gets activated before Nginx (that acts as a reverse proxy).

With the following command, we can automatically generate the configuration files shown above for all our processes in the processes model, and use it to automatically create and start docker containers for all process instances:


$ nixproc-docker-switch processes.nix
55d833e07428: Loading layer [==================================================>] 46.61MB/46.61MB
Loaded image: webapp:latest
f020f5ecdc6595f029cf46db9cb6f05024892ce6d9b1bbdf9eac78f8a178efd7
nixproc-webapp
95b595c533d4: Loading layer [==================================================>] 46.61MB/46.61MB
Loaded image: nginx:latest
b195cd1fba24d4ec8542c3576b4e3a3889682600f0accc3ba2a195a44bf41846
nixproc-nginx

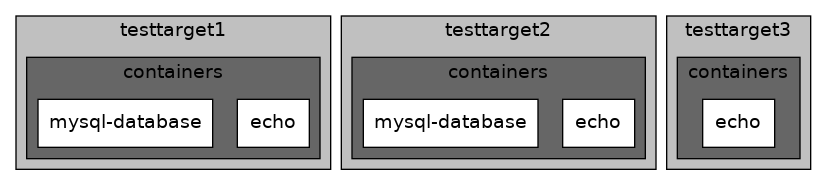
The result is two running Docker containers that correspond to the process instances shown in the processes model:


$ docker ps
CONTAINER ID IMAGE COMMAND CREATED STATUS PORTS NAMES
b195cd1fba24 nginx:latest "/nix/store/j3v4fz9h…" 15 seconds ago Up 14 seconds nixproc-nginx
f020f5ecdc65 webapp:latest "/nix/store/b6pz847g…" 16 seconds ago Up 15 seconds nixproc-webapp

and we should be able to access the example HTML page, by opening the following URL: http://localhost:8080 in a web browser.

Deploying Docker containers in a heteregenous and/or distributed environment


As explained in my previous blog posts about the experimental Nix process management framework, the processes model is a sub set of a Disnix services model. When it is desired to deploy processes to a network of machines or combine processes with other kinds of services, we can easily turn a processes model into a services model.

For example, I can change the processes model shown earlier into a services model that deploys Docker containers:


{ pkgs ? import <nixpkgs> { inherit system; }
, system ? builtins.currentSystem
, stateDir ? "/var"
, runtimeDir ? "${stateDir}/run"
, logDir ? "${stateDir}/log"
, cacheDir ? "${stateDir}/cache"
, tmpDir ? (if stateDir == "/var" then "/tmp" else "${stateDir}/tmp")
, forceDisableUserChange ? false
}:

let
constructors = import ./constructors.nix {
inherit pkgs stateDir runtimeDir logDir tmpDir;
inherit forceDisableUserChange;
processManager = "docker";
};
in
rec {
webapp = rec {
name = "webapp";

port = 5000;
dnsName = "webapp.local";

pkg = constructors.webapp {
inherit port;
};

type = "docker-container";
};

nginxReverseProxy = rec {
name = "nginxReverseProxy";

port = 8080;

pkg = constructors.nginxReverseProxyHostBased {
webapps = [ webapp ];
inherit port;
} {};

type = "docker-container";
};
}

In the above example, I have added a name attribute to each process (a required property for Disnix service models) and a type attribute referring to: docker-container.

In Disnix, a service could take any form. A plugin system (named Dysnomia) is responsible for managing the life-cycle of a service, such as activating or deactivating it. The type attribute is used to tell Disnix that we should use the docker-container Dysnomia module. This module will automatically create and start the container on activation, and stop and discard the container on deactivation.

To deploy the above services to a network of machines, we require an infrastructure model (that captures the available machines and their relevant deployment properties):


{
test1.properties.hostname = "test1";
}

The above infrastructure model contains only one target machine: test1 with a hostname that is identical to the machine name.

We also require a distribution model that maps services in the services model to machines in the infrastructure model:


{infrastructure}:

{
webapp = [ infrastructure.test1 ];
nginxReverseProxy = [ infrastructure.test1 ];
}

In the above distribution model, we map the all the processes in the services model to the test1 target machine in the infrastructure model.

With the following command, we can deploy our Docker containers to the remote test1 target machine:


$ disnix-env -s services.nix -i infrastructure.nix -d distribution.nix

When the above command succeeds, the test1 target machine provides running webapp and nginxReverseProxy containers.

(As a sidenote: to make Docker container deployments work with Disnix, the Docker service already needs to be predeployed to the target machines in the infrastructure model, or the Docker daemon needs to be deployed as a container provider).

Deploying conventional Docker containers with Disnix


The nice thing about the docker-container Dysnomia module is that it is generic enough to also work with conventional Docker containers (that work with images, not a shared Nix store).

For example, we can deploy Nginx as a regular container built with the dockerTools.buildImage function:


{dockerTools, stdenv, nginx}:

let
dockerImage = dockerTools.buildImage {
name = "nginxexp";
tag = "test";
contents = nginx;

runAsRoot = ''
${dockerTools.shadowSetup}
groupadd -r nogroup
useradd -r nobody -g nogroup -d /dev/null
mkdir -p /var/log/nginx /var/cache/nginx /var/www
cp ${./index.html} /var/www/index.html
'';

config = {
Cmd = [ "${nginx}/bin/nginx" "-g" "daemon off;" "-c" ./nginx.conf ];
Expose = {
"80/tcp" = {};
};
};
};
in
stdenv.mkDerivation {
name = "nginxexp";
buildCommand = ''
mkdir -p $out
cat > $out/nginxexp-docker-settings <<EOF
dockerImage=${dockerImage}
dockerImageTag=nginxexp:test
EOF

cat > $out/nginxexp-docker-createparams <<EOF
-p
8080:80
EOF
'';
}

In the above example, instead of using the process manager-agnostic createManagedProcess, I directly construct a Docker-based Nginx image (by using the dockerImage attribute) and container configuration files (in the buildCommand parameter) to make the container deployments work with the docker-container Dysnomia module.

It is also possible to deploy containers from images that are constructed with Dockerfiles. After we have built an image in the traditional way, we can export it from Docker with the following command:


$ docker save nginx-debian -o nginx-debian.tar.gz

and then we can use the following Nix expression to deploy a container using our exported image:


{dockerTools, stdenv, nginx}:

stdenv.mkDerivation {
name = "nginxexp";
buildCommand = ''
mkdir -p $out
cat > $out/nginxexp-docker-settings <<EOF
dockerImage=${./nginx-debian.tar.gz}
dockerImageTag=nginxexp:test
EOF

cat > $out/nginxexp-docker-createparams <<EOF
-p
8080:80
EOF
'';
}

In the above expression, the dockerImage property refers to our exported image.

Although Disnix is flexible enough to also orchestrate Docker containers (thanks to its generalized plugin architecture), I did not develop the docker-container Dysnomia module to make Disnix compete with existing container orchestration solutions, such as Kubernetes or Docker Swarm.

Disnix is a heterogeneous deployment tool that can be used to integrate units that have all kinds of shapes and forms on all kinds of operating systems -- having a docker-container module makes it possible to mix Docker containers with other service types that Disnix and Dysnomia support.

Discussion


In this blog post, I have demonstrated that we can integrate Docker as a process management backend option into the experimental Nix process management framework, by substituting some of its conflicting features.

Moreover, because a Disnix service model is a superset of a processes model, we can also use Disnix as a simple Docker container orchestrator and integrate Docker containers with other kinds of services.

Compared to Docker, the Nix process management framework supports a number of features that Docker does not:

  • Docker is heavily developed around Linux-specific concepts, such as namespaces and cgroups. As a result, it can only be used to deploy software built for Linux.

    The Nix process management framework should work on any operating system that is supported by the Nix package manager (e.g. Nix also has first class support for macOS, and can also be used on other UNIX-like operating systems such as FreeBSD). The same also applies to Disnix.
  • The Nix process management framework can work with sysvinit, BSD rc and Disnix process scripts, that do not require any external service to manage a process' life-cycle. This is convenient for local unprivileged user deployments. To deploy Docker containers, you need to have the Docker daemon installed first.
  • Docker has an experimental rootless deployment mode, but in the Nix process management framework facilitating unprivileged user deployments is a first class concept.

On the other hand, the Nix process management framework does not take over all responsibilities of Docker:

  • Docker heavily relies on namespaces to prevent resource conflicts, such as overlapping TCP ports and global state directories. The Nix process management framework solves conflicts by avoiding them (i.e. configuring properties in such a way that they are unique). The conflict avoidance approach works as long as a service is well-specified. Unfortunately, preventing conflicts is not a hard guarantee that the tool can provide you.
  • Docker also provides some degree of protection by using namespaces and cgroups. The Nix process management framework does not support this out of the box, because these concepts are not generalizable over all the process management backends it supports. (As a sidenote: it is still possible to use these concepts by defining process manager-specific overrides).

From a functionality perspective, docker-compose comes close to the features that the experimental Nix process management framework supports. docker-compose allows you to declaratively define container instances and their dependencies, and automatically deploy them.

However, as its name implies docker-compose is specifically designed for deploying Docker containers whereas the Nix process management framework is more general -- it should work with all kinds of process managers, uses Nix as the primary means to provide dependencies, it uses the Nix expression language for configuration and it should work on a variety of operating systems.

The fact that Docker (and containers in general) are multi-functional solutions is not an observation only made by me. For example, this blog post also demonstrates that containers can work without images.

Availability


The Docker backend has been integrated into the latest development version of the Nix process management framework.

To use the docker-container Dysnomia module (so that Disnix can deploy Docker containers), you need to install the latest development version of Dysnomia.

by Sander van der Burg (noreply@blogger.com) at August 11, 2020 07:18 PM